Showing posts with label Royal Enfield technical tips. Show all posts

Friday, April 19, 2024

Clutch cable won't work? Here's a fix

Cotton swab through hole in gearbox back.
Cotton swab shows path of Royal Enfield clutch cable through back of four-speed gearbox.

 "Eeeewwwwwwww," my wife groaned, as she picked up my helmet from the sidewalk and put it into our car. 

"That is one soggy helmet!" she said. 

No surprise. 

I had just pushed my 1999 Royal Enfield Bullet about a mile, with my helmet on because I had no other place to put it besides on my head. 

I had considered abandoning my helmet and returning for it later, but figured that if she came in the car and got it she could also bring me some water to drink. 

I would need the water. I still had another mile to push to get home. Luckily we live in Florida, where there are no hills to push up. 

Several people stopped to offer help. Did I need gas? Nope, got plenty. Did I need to borrow some tools? Nope. I have a full kit on board and could fix the problem -- if I only knew what it was. 

It all started with a broken clutch cable. (This time the little nub on the end of the cable broke off at the lever. Usually it's the nub on the gearbox end that breaks off.)

Luckily I carry a spare cable and all the tools needed to swap it in. I've done it on the side of the road before. (My spare cable is extra long, so it need not be threaded through the nacelle, but can arch over the handlebars.)

This time, however, the moment I set off with my new cable installed, the clutch lever went right to the handlebar and the motorcycle stalled. Once again I couldn't disengage the clutch!

I knew the problem couldn't be another broken clutch cable, so soon. I'd need time in the my garage to diagnose this problem, and that meant a two-mile push home! Ugh.

Thanks to the four-speed Bullet's neutral finder lever I was able to put the gearbox into neutral.

And so the long, hot push began.

The next morning I began taking a closer look. Indeed, the new clutch cable was intact.

The trouble was that the cable could not operate the clutch because its whole end had been pulled inside the gearbox. To work, the outer cable must stop at the gearbox wall and allow only the inner cable to respond to the handlebar clutch lever.

View of hole in gearbox from back side.
View from behind of hole that must grip outer cover of clutch cable.

Removing and replacing the cable was no help: the first pull on the handlebar lever once again yanked the cable through the hole into the gearbox. Obviously, the hole had grown just big enough to allow the fat end of the outer cable to pull right in.

I'm stumped on how to make that hole smaller. All I could think of was to put a washer on the outer cable to stop it from being pulled into the hole.

It's a bodge, not a perfect fix. The washer barely grabs the shallow ridge at the cable end, and in doing so it holds the cable slightly proud of how deeply it should be held in the hole.

Gearbox end of cable with washer fitted.
Washer will keep all but narrow tip of outer cable from entering gearbox hole. Note the shallow "shoulder" of the cable that is supposed to prevent it going into the hole, but doesn't. It will keep the washer in place, I hope.

The effect of this is to shorten the reach of the inner cable. It is just slightly shorter, but enough so that I had to leave off the cable adjuster at the lever end to let it reach the ferrule that holds it at the handlebar lever.

I'll replace the adjuster when the cable has stretched enough.

The photos here explain how I made my "fix."

Washer held in vise has flat side filed into it.
I filed a flat side onto the washer to better fit near the gearbox hole.

The washer I used has an internal diameter of 3/8 inch (8mm). It must be rather a common size as my spare parts bin is full of them. Since replacing the cable roadside will undoubtedly result in the washer falling off and disappearing I put a package of extra washers into my on-board toolkit for next time.

But there IS a better solution: In "My Cart" at Hitchcocks Motorcycles is clutch cable part No. 142453A, for Bullets made before June, 1999 with the Magura handlebar controls. Allan Hitchcock suggested it in response to a question from me.

In an email, he wrote of this cable:

"There is the top hat outer cable ferrule which locates in the case of the gearbox (the originals had a crude domed ferrule). This looks to have a bigger diameter shoulder to the ones in your photo, which will prevent it pulling through."

That's just exactly what I need. 

Finally, I'd like to thank the charming young sales associate at the business whose parking space I used to initially replace the clutch cable. She graciously offered me a bottled drink, which I had the affrontery to refuse, so confident was I that my repair was complete.

How badly I suffered with thirst in the blocks before my wife came to the rescue with a thermos of water. Serves me right.

Friday, February 9, 2024

I fixed my Royal Enfield Bullet! Maybe

 The old Royal Enfield Bullet, made in India, is a simple, single-cylinder motorcycle. One spark plug! 

Early ones have no electric starter, no fuel injection, no disc brakes and no electronic ignition. The pushrods are easily adjusted through a panel in the side of the motor opened by removing a single nut. 

So, when something does go "wrong" with this simple machine, the problem is very likely to be something very simple. 

But finding that problem can be confounding. 

I was privileged to re-learn this lesson the other day. 

My 1999 Royal Enfield Bullet normally starts after a couple of kicks, or maybe three. But, this time, the first kick was accompanied by a small "pop" and subsequent kicks seemed to do nothing.

Looking down past my legs, I saw that the carburetor was no longer attached to the motor. It was hanging from the air filter box. That "pop" had blown it off.

One can't expect the motorcycle to start without a carburetor.

The rubber hoses connecting the carb to the motor on one side and, on the other side, to the air filter box, are awkward. Of course they have to fit tightly to prevent air leakage, and so it is something of a struggle to get them back on.

A bit of grunting and they were back on. I kicked again. "Pop." And the carb was, once again, hanging from the air filter box.

That's not really surprising, since I had done nothing to fix the "source" of the problem. That's because I had guessed that the awkward hoses had simply slipped off, perhaps loosened by vibration, and left the carb hanging.

But if that wasn't the problem, what was?

I reattached the carb, getting it on really tight this time. I kicked again. No joy, but at least the carb did not pop off the motor.

I tried experimenting with the enrichment lever. On. Off. On. Off. No joy.

I always set the Bullet's idle high before trying to start; my Bullet seems to like that. Perhaps I had gotten it set too high and given the engine too big a gulp of gasoline? I dialed down the idle screw and I kicked again. No joy.

Next I pulled the spark plug to look for clues. It was dirty. I cleaned and reinstalled it. Then I kicked again. No joy.

I removed the cover of the points set, and used a business card to clean the points. Then I kicked again. No joy.

The spark plug, although now clean, had looked pretty ratty and old. I pulled it again and put my (by no means new) spare plug in its place. Then I kicked again. No joy, but the motor sounded hopeful.

What if I had already found and fixed the problem, but the fact that I had turned down the idle was preventing the motor from starting? (Remember, I said my Bullet likes the idle turned up when starting.)

I turned up the idle and the Bullet started! I suited up and rode off, with the motor cheerfully racking up plenty of rpm.

Too many rpm.

I turned down the idle, but the motor continued to run fast. Turned it down some more. Still fast. Turned it down a couple more times. Still too fast. The idle screw seemed to have no effect.

OK. OBVIOUSLY, with all the removing and replacing the carburetor on the motor the throttle cable had gotten snagged where it enters the carburetor and the cable was pulled just enough to keep the engine rolling at a frantic pace. While waiting at an intersection I reached down and gave the cable a poke near the top of the carb.

THE ENGINE IMMEDIATELY DIED! I had dislodged the snagged cable and it retracted, immediately killing the revs. Why didn't the motor continue to run, if only more slowly?

Well, duh. I had been turning the idle screw down repeatedly and, with the cable now free to seat itself properly, the rpm was set too low to keep the engine turning over.

I duck paddled the bike onto the sidewalk, got off and did my best to make throttle and idle screw agree on a favorable setting.

And then I rode home.

My simple machine was now acting normally. Somehow, I had "fixed" it. Exactly how is a mystery. My guess is that it all it needed was a new spark plug.

Friday, December 3, 2021

Here's an easy way to change oil in a Royal Enfield

Royal Enfield Bullet next to two oil jugs.
Why two big jugs of oil? One is empty so I can premeasure the oil to be added.

 It was time to change the oil in the motor of my 1999 Royal Enfield Bullet.

 I specify that it was time to change the oil in the motor because my old Royal Enfield also has oil in the gearbox and another kind of oil in the primary drive. Those would have to wait for next time; changing the oil in the motor is enough for one day.

 The motor alone has two drain plugs, not one, as you might expect. The oil filter is not a handy spin-off cartridge, but an oil soaked felt tube that must be inserted, dripping oil, into the motor.

But first the old oil and the old dripping filter must be removed. The first step in doing that is to round up every spare rag in the house, because I knew I was going to need them.

New oil filter gets a dunk in clean oil.
New oil filter gets a bath in clean oil before insertion.

The manual says the motor wants 2.25 liters of oil. I only understand "liters" as a measure of Coca-Cola. As in "one liter bottle of Coca-Cola will have lost all its fizz before I finish half of it."

So it was also time to renew my acquaintance with how many quarts there are in a liter, how many quarts there are in a gallon, how many cups there are in a half-gallon and how many cups there are in a quarter of a quart.

Luckily I have a system for this: I just ask my wife. She does all our cooking, so she is familiar with liquid measures.

The good news, for me, is that 2.25 liters turns out to be just a short distance from 2.25 quarts. Call it even. Easy!

And, as usual, I had a strategy in mind to make changing the oil even easier.

I always have a strategy for changing my Royal Enfield's oil, every time I do it. Just never the same strategy as, so far, no strategy has worked out very well.

Pouring oil from one jug into another.
I premeasured the oil by pouring it into the empty jug.

This time the great innovation would be that I would first measure out the amount of clean oil to be added to the motor once the old goo had vacated. This would avoid having to rely on the Royal Enfield dipstick, which I've discovered is wildly unreliable.

Why this should be so probably has to do with all the places oil has to find its way around to inside the Royal Enfield motor. If you fill an old Royal Enfield's oil tank to the "Full" mark on the dipstick, and go for a ride, you will find little or no oil showing on the dipstick next time you check.

More oil has to be added to the tank to account for the oil that gets distributed. More, but how much? There's no way to know.

Ah hah! You see, this time, with my 2.25 quarts of oil premeasured I would be able to fill the oil tank, to the Full mark on the dipstick, conserving whatever was left over in my container, and then, after the first ride, add the left overs to achieve the perfection of exactly 2.25 quarts circulating inside the motorcycle.

Oil jug marked for 2.25 quarts.
Oil jug includes a handy "window" to measure quantity.
Quarts on the left, liters on the right. Notice how close they are.

Minus whatever leaked out or got spilled, of course.

It didn't really work out. In my struggle with liquid measure I mistakenly marked my jug at the 2.5-quart mark instead of 2.25. I had pre-measured too much oil! Adding the remaining amount after the first ride would be a quarter of a quart too much. I would have to adjust.

I'll do it right next time.

Friday, May 21, 2021

When your old Royal Enfield runs great, then stops

Wrenches are shown adjusting pushrod.
You'll need three wrenches to adjust each pushrod.
What do you mean you only have two hands?!!

I'm no mechanic, but readers often write in to ask for help getting their old Royal Enfield Bullets running.

"It doesn't start!" is the most common complaint. Almost always, this will be followed by "But it was just running!"

It's true. The line between a Bullet running like a champion and not running at all is apparently very narrow.

This leads to dismay. I know.

Because it just happened to me.

I rolled my 1999 Bullet out of the garage, donned my riding gear and carried out my starting drill (turn up the idle knob on the carb, turn on the kill switch, ignition and gas tap, set the piston just past top-dead-center, and kick).

I'd been out of town and away from the motorcycle for several weeks, so I did not expect it to start on the first kick. It didn't. Started on the second kick, though.

Great!

And then it died. This is unusual for my Bullet.

I repeated the starting drill, being certain to see that the gas tap was on and that the spark plug wire was on the spark plug firmly.

All good. Except, this time, when I went to set the piston, the kick start lever encountered little or no resistance at any point.

No compression! An internal combustion engine won't start or run without compression.

"But it was just running!" I complained, to myself. It's unfair!

The Bullet sat there, unmoving and unmoved by my distress.

Sometimes, left standing for a couple weeks, a Bullet can lose compression as oil leaks down from the rings. A dollop of oil into the spark plug hole and a series of dry kicks will often restore compression.

But when I removed the spark plug this time I found it completely oiled, sodden really. This is a problem my Bullet has, but it made it pretty apparent that there was plenty of oil in the cylinder. Certainly no need to add more. I cleaned the plug and reinstalled it.

There are only three ways I can think of for compression to escape from an iron barrel Bullet, if not past the rings: out the compression release (of course) or out either or both the intake or exhaust valve.

If one or both push-rod valve lifters are adjusted too tightly they can open their valve, allowing compression to get away.

I removed the valve tappet cover and checked the pushrod adjusters. With the piston at top dead center you should be able to rotate the pushrods by pressing on them with your thumb.

Both my pushrods were too tight to move with my thumbs. I got out my tools and very, very slightly adjusted the exhaust pushrod (the one furthest forward) so it was loose enough to turn easily. Instructions on how to do this are here.

I checked the kick start lever. Magic! The lever firmly resisted moving past the point of compression. The Bullet has compression!

The motor now started on my very first kick. I put my tools away. I didn't even bother to loosen the inlet valve pushrod. No sense risking clatter unnecessarily. Instead, I went for the ride I had planned.

I can't explain why my Bullet had full compression the first time I started it, or why that compression would suddenly disappear when the motor had run for a few seconds.

Friday, February 12, 2021

Royal Enfield won't start? Check for a carburetor

Close-up of motorcycle carburetor.
Carburetor nearly knocked out of hose to motor, right.

Your Royal Enfield Bullet won't start? Check to see if the carburetor has fallen off.

Or, more accurately, been blown off.

Let me explain. I ducked into the garage Monday all suited up and ready to ride my 1999 Royal Enfield Bullet. I was pretty confident. It had run perfectly on our previous outing only a few days before, and I had plenty of gas.

My first kick, though, brought a powerful kick back from the motor. That happens sometimes. Just clearing its throat, I figured. I was surprised when the second and third kicks brought more kickbacks. Each one was more mild than the one before.

And then: nothing, no matter how much I kicked. Not even a kickback anymore.

I went through my starting drill carefully. No good. I changed the spark plug. Nothing. With time for a ride running short I rolled the motorcycle back into the garage.

A motorcycle only needs three things to start they say: Compression (I could feel that through the kick starter lever). Fuel (I thought I had that). And Ignition.

There's an old saying that most fuel problems are electrical problems.

"It's always the electrical system," runs an old saw.

So Tuesday I started with that, cleaning and adjusting the points even though they were fine to start with. I experimented with different spark plug gaps. I experimentally advanced and then retarded the ignition timing.

No joy.

So, Wednesday, I decided I would have to consider a new battery.

My multimeter is a cheap Radio Shack device my dad gave me when I was in Junior High School, 55 years ago. I don't trust it and, in fact, internal corrosion finally dealt it a death blow this time. But before that happened I managed to get identical readings from the motorcycle battery and the battery of my car. So the battery (relatively new) was probably still good.

Thursday, I decided I would tackle the fuel system. Maybe, I thought, I could rap on the side of the carburetor to free the floats, assuming they were stuck.

Close-up of air leak into the motor.
Backed out and off kilter, carb let lots of air enter motor.

But wait. As I tapped the carburetor with the hilt of a screwdriver, something struck me as odd.

I knew I had my answer: the carburetor was coming off the motor, leaving an opening that undoubtedly drew in more air than fuel. The motorcycle wasn't going to start in this condition.

But with the carburetor back in place, the motorcycle started right up. No kickback either.

Did the original kickbacks knock the carb back off its inlet fitting? Or had it already fallen loose, causing the kickbacks with an over-lean mixture?

I don't know. But add examining the carburetor to the list of a hundred things I'll check next time my Bullet gets too grumpy to start.

Carburetor and air filter box clearly out of place.
Air filter box leaning way left should have been the tip-off.


Friday, January 8, 2021

I'm screwed when Royal Enfield fender nut vibrates off

Close up of bolt and motorcycle fender.
Random bolt and split washer on fender, compared to original.

Part No. 141306, NUT, NYLOC, M6 fell off my Royal Enfield Bullet motorcycle.

It left behind, hanging by a thread, Part No. 142894, SCREW M6, FRONT MUDGUARD ROLLED.

Those descriptions are thanks to the very useful Royal Enfield parts books from the past, available on the Hitchcocks Motorcycles website.

What happened, in non-technical terms, is that the nut holding the screw that holds the front fender to the stay that attaches to the front fork vibrated off and is gone forever.

The knee bone is connected to the thigh bone... except when it falls off.

What happened is, I discovered the screw barely holding its grip on the fender when I noticed the whole fender vibrating far more than usual to the beat of the motor.

Amazing that the loss of one fastener could allow so much motion. Amazing, too, that this bolt and nut had withstood that vibration for 20 years and 45,000 miles.

I was in a hurry to ride, so I replaced the screw and missing nut with random (and less attractive) ones found in my garage work bench.

Appearance is perhaps secondary to function on a 1999 motorcycle that has seen many a mile. But I like the look of the shiny, round-headed original bolts with their classic single slots against the dark green fender of my Bullet. Trouble is, I couldn't find a nut to fit my original bolt.

The Internet seems to offer every other variety of M6 bolt, none of them in the least attractive.

Pretty M6 bolts may be hard to find, but the one nut I need to hold this one on should turn up someplace in my workbench. The nut goes on behind the fender, so it needn't be pretty. It just has to fit.

The search begins.

Friday, August 21, 2020

200-odd miles means it's time to fuel my Royal Enfield

Close-up of Royal Enfield odometer showing 506 miles.
All I have to remember to do is tank up at the 700-mile reading.
Remember when I almost lost control of my Royal Enfield Bullet motorcycle when it ran out of gas? It's a 1999, well before Royal Enfields got gas gauges, so this could happen again.

The fault was mine, as I had deliberately decided to run out of gas to practice switching the fuel tap to "Reserve." When the moment came I wasn't ready and didn't handle it well.

I resolved not to run out again, using a technique I found recommended on an Internet forum.

Namely, gas up every time the odometer turns over 100 miles.  Easy!

Noticing recently that the odometer was only 22 miles from turning over the 100s tumbler, I plotted a short ride that would end at a gas station. Let's get started!

First though, I removed the cap to make sure I did have some gas. Yes, indeed, I could see the liquid in the tank. Good to go!

Suffice it to say that the motorcycle ran out of gas four miles short of the station. Luckily this didn't happen at an intersection and I coasted to stop where I could switch to Reserve and restart the motorcycle safely.

At the station I filled the tank, noting that the receipt credited me with the purchase of 3.178 gallons. Since my Bullet gets about 72 miles per gallon in the city, it's probable that I can safely cruise more than 200 miles on a full tank without needing Reserve.

Hmmm. Two hundred miles. That means that tanking up every 100 miles, as I had pledged, would have me pumping gas twice as often as really necessary, a nuisance.

So here is my plan: I will fill the tank every time the 100s tumbler turns over another 200 miles.

But wait, you say: I'll naturally forget what 100 I am at and end up trying to reach 300 miles between fill-ups. That means I will find myself walking rather than riding.

No, I don't think so and here's why: I plan to fill up every time the tumbler hits an ODD number. This time at 500, next time at 700, then 900, 100 again, 300 and so forth.

Let's see if I can do it.

Friday, August 7, 2020

Royal Enfield oil filter: Which diagram is right?

Diagram of Royal Enfield oil filter assembly.
There's something funny about this illustration from
the owner's manual of my 1999 Royal Enfield Bullet.
If you own an old-fashioned, iron-barrel Royal Enfield Bullet motorcycle, you know that changing the oil filter is a messy job. Instead of a modern spin-on oil filter, you have a filter "element" that fits inside a housing in the side of the motor.

It is held in place by a spring-loaded cover and associated washers and nut.

Your owner's manual explains how to put all these bits back together. In a blog item here in 2008 I noted one oddity in the diagram shown in the owner's manual of my 1999 Royal Enfield:

The spring in the cap bears directly on a delicate felt washer!

The felt washer in turn is on top of a metal washer that would likely better withstand the pressure of the spring. Shouldn't these two be reversed, to put the spring pressure directly on the metal washer?

If so, is that a typographical error in the manual?

Well, if it is, my dealer didn't balk at it when he changed the oil. That's the way I found the pieces arranged when I did my own first oil change.

And I have done it this way, ever since, despite a friendly warning from a reader that I had it wrong. I have always wondered whether I am right or wrong.

Then, recently, I came across an eBay ad for a 1954 owner's manual for a Royal Enfield 250cc Clipper. Despite its age, the design of the 1954 Clipper is related to my 1999 Bullet.

(Proof that my motorcycle is a true antique, although still only 21 years old.)

Diagram of Royal Enfield oil filter assembly.
This illustration from the 1954 owner's manual shows
the metal washer between the spring and the felt washer.
Sure enough, the oil filter diagram in the 1954 manual shows the felt washer belongs beneath the metal washer, where it is protected from the spring.

Which manual is correct, 1954 or 1999? Does it matter? I don't know.

In 2008 I wrote that reversing the order of felt and metal washers resulted in a leak. But I now question how anything could have leaked past that firmly attached spring cap.

I guess I will have to it try again.

Your comments are invited, below.

Friday, June 12, 2020

Replacing my Royal Enfield brake light switch

Illustration from parts books.
Marked No. 9, the switch I needed appeared in the online parts book.
There it is in the Hitchcocks Motorcycles online parts book for the 1996 Royal Enfield Bullet 500 motorcycle, export model.

It's Part No. 141892, Switch, Front Brake Light With Cables, Magura.

And now I have one — the switch, at least, it didn't come with cables.

It came from an eBay seller, in a battered plastic bag, marked only with the scrawled number I eventually decided might be 141892.

It's not exactly like the original switch I found installed in my early-1999 Royal Enfield Bullet, but it was close enough. And, unlike the original unmarked switch, this one is marked "Magura."

Two switches side by side, one on left very worn looking.
The worn out original switch, left, with my new Magura switch, right.
That's a magic word, since Magura made the handlebar controls fitted to my Bullet. That changed mid-year in 1999, and later switchgear bits won't fit on my motorcycle. The parts I need when my controls wear out are now nearly unobtainable.

When my handlebar brake light switch first stopped working I made a mental note to always press down on the foot brake in traffic, since it would still trigger the brake light to signal I was stopping, or attempting to stop, at least.

Probably adequate. But there is something about something not working on the bike that bugs you. Really, a rider has enough to keep in mind without having to compensate for some missing contribution from the controls.

But I was stymied: my outdated handlebar controls use that specific looking switch and normal suppliers don't stock it. Their suggestion — just replace all the controls — didn't appeal. Hitchcock's seemed to have it, but the price was high.

Then a kind gent in the UK stepped up and said, since he had replaced all his controls, I could have the precious switch I needed from his parts bin.

I was back in business. But the new switch — it looked brand new and was in original packaging — quit working after only four months. Obviously, these things aren't eternal.

So, when I saw an eBay ad for a switch in Minnesota, I hopped on it. This one had no wiring, no original packaging, and it didn't look perfectly identical to the two non-functional switches (the original and the one from the UK) now in hand.

But, unlike those, it carried the precious word "Magura." It might be no better, it might even be counterfeit, but it appealed to me.

As a precaution, I asked the seller to test the switch to see if it worked. There was no response. Take it or leave it, I suppose. I took it.

And it's working (no thanks to the horrible soldering job I did attaching the wires).

I wonder how long it will last?

UPDATE: If you are just done with keeping your Magura (no longer made and hard to find) levers working, I notice that Hitchcocks Motorcycles has a kit to replace them with Minda levers.

Friday, June 5, 2020

Royal Enfield Owners' Manual isn't boring

We don't usually turn to our motorcycle owners' manual for humor.

Maybe riders would pay better attention to the fine points of maintenance if the owners' manuals were more entertaining.

I was a little surprised when I spotted an example of just this sort of fun, in the owners' manual for a vintage Royal Enfield motorcycle.

For sale on eBay recently was the Fifth Edition (May, 1950) of the "Instruction Book for the Royal Enfield 125cc Model R.E. Motor Cycle."

In his ad, the seller posted photos of several pages of the booklet.

These included a page of "DO'S AND DON'TS FOR DRIVERS".

Among the bits of advice:

"DON'T run your tyres too soft; they cost money, air does not."

And...

"DO use the lower gear ratios when necessary — that is why they are provided."

No one will bust their sides reading these. But the evident light touch does make an otherwise boring list more memorable.

List of Do's and Don'ts for Drivers from Royal Enfield manual.
Not terribly funny but at least they tried.

Friday, May 29, 2020

Rinse sump while changing Royal Enfield oil?

Hand holds small bottle of clean oil in front of motorcycle.
My wife prepares to pour clean oil into my Royal Enfield Bullet.
Getting oil on my hands (and on the garage floor) is part of owning an old-fashioned Royal Enfield Bullet motorcycle. Mine is an iron barrel Bullet, the original British design of 70 years ago, but built in India in 1999.

Modern Royal Enfields are nothing like this, I assume, as they have a single drain for motor and gearbox oil, and a spin-on oil filter cartridge.

Not so my old Bullet. Never mind the gearbox, which has its own drain plug. My motor has a drain plug for its oil tank, a drain plug for the motor's sump, and an oil soaked filter to be inserted, dripping, into its home.

Changing the oil is still a simple process but, since nearly every instance is messy enough to be memorable, I've described changing the oil before.

In the previous episode I described how only 1.75 quarts of dirty oil emerged when I drained the oil tank, the separate sump and the oil filter.

The book says that the motor holds about 2.4 quarts of oil. So either I was more than half a quart low on oil, or that much oil remains inside the motor even when drain plugs are opened.

Last time I guessed that since I only got 1.75 quarts out, I should replace only 1.75 quarts. But I found afterwards that the motor tended to show well under the halfway full mark on the dipstick after a run.

So, this time, I decided I would replace the 1.75 quarts of dirty oil I (again) recovered with slightly more than two quarts of fresh oil.

But first, I wanted to conduct an experiment.

Once, years ago, while changing the oil I accidentally added fresh oil to the oil tank before plugging up the drain holes! I watched in horror as oil shot out of the bottom of the tank onto the garage floor. But I also watched in interest and surprise, as the stream of escaping oil was at first black — not clean.

In my carelessness, had I helpfully flushed out residual dirty oil in the tank? I wanted to find out.

So, this time, I videotaped the drain holes as my wife poured a bit of clean oil into the tank. Watch the video. The stream of oil emerging from the drain hole looks pretty clean, but a photo of the recovered rinse oil shows a distinctive dirty tinge. And much less oil came out then went in!

Hand hold small glass bottle now filled with recovered oil.
Recaptured rinsing oil shows a distinctive dirty tinge. And there's less than went in.
Perhaps, by rocking the motorcycle from side-to-side, as I now do, I had managed to drain out more dirty oil than I used to. This is supported by the fact that less oil drained out than the sample my wife poured in; presumably this "loss" equals the amount of oil that remains in the tank but can be brought out by rocking the motorcycle.

In any case, I conclude that "rinsing" the tank is a help, but rocking the motorcycle slightly from side to side also encourages more dirty oil to evacuate.

Friday, March 6, 2020

Install an LED headlight in an old Royal Enfield Bullet

LED light as installed in a Royal Enfield Bullet motorcycle.
LED headlamp conversion provides bright light for this 1999 Royal Enfield Bullet.
Seeking a better headlight for one of his 1999 Royal Enfield Bullets, Californian Mitch Smith installed an LED lamp.

"The LED should hopefully make 10,000-20,000 hours of run-time and be 'totally' immune to vibration. We'll see! These sorts of electrical things usually run either 30 feet or 30 seconds or 30 years.

"All I want it for really is as a fool-proof daytime running light — night riding holds no attraction for me anymore," he wrote.

Like my 1999 Royal Enfield, his Bullet has the U.S.-spec aimable headlight with its special hardware. Since they're only used in the U.S., it can be hard to find information about how to modify these.

Mitch graciously shares his step-by-step procedure and photos below:

There are many 5 3/4-inch LED lights available. Prices are from $20 (U.S.) to $100. Mine ran $40 and was intended for use in a Harley-Davidson Sportster. (If you ever thought your iron-barrel Bullet vibrates a lot, cage a 10-minute ride on a Sporty; that's about all you'll want. The Bullet is a Honda Gold Wing by comparison.)

Our headlights have an adjustment and retaining ring (A&R). This assembly has horizontal and vertical adjusters, three very thick plain "fingers," and a retaining spring lug.

The view inside the headlight assembly as it looks in U.S. models.
Original U.S. arrangement includes inner bowl, adjusting screws and spring to aim the headlight.
The rear of the inner bowl must be cut off to make a bigger hole for the LED to fit through.
You'll also be cutting off the three long "fingers" that hold the inner bowl in place.
But do not remove the lugs that hold the spring and the two adjustment screws. 
The OEM headlight is sandwiched between a smaller inner thin front chrome ring and a black-stamped shell/bowl. The plain A&R fingers touch the inner shell and provide a bearing surface to allow for headlight aiming. The LED unit is MUCH thicker than the OEM sealed beam, which necessitates some modification to fit. 

Chopped off back end of inner bowl makes bigger hole for the LED.
The amputated rear of the inner bowl. Discard this.
Cut off the rear of the black stamped-steel headlight mounting bowl with grinder, leaving about 15mm of thickness to keep ring stable. The hardest part of the whole project was cutting the bowl apart evenly — a thin cut-off wheel would have made life easier.

LED now fits through inner bowl.
Now with a wider opening, the inner bowl accommodates the LED.
DO NOT cut off the A&R retaining spring lug with the 1/4-inch hole in it. You will need this to create the new "pivot."

Cut off all three of the A&R ring's thick iron plain supporting fingers with the grinder. It was time consuming but straightforward to grind off the straight fingers. The A&R ring is too thin to just "bend and fatigue" these off.

Only the base of "finger" remains inside chrome ring.
Remains of one of the plain "fingers" after cutting. Don't try to twist them off.
Insert LED light into black cut-down bowl, and secure by using the thin front chrome ring and three original screws. You may need a gasket/packing/glue, but mine was snug as is.

Inside of chrome ring still has lugs to hold adjustment screws.
The two original aiming screws help locate the LED in the assembly.
Don't cut them off.
Get a 2-inch-long, 8/32nd-inch screw and nut. Assemble these through the retaining spring lug hole and bend the soft steel screw over as needed to meet the groove in the headlight ring assembly.

Spring pulls inner bowl tight against the end of a new screw.
Add a screw through the lug holding the spring and secure it with a nut below.
Bend the screw to reach the ring. It won't have to turn, it's there to hold things in place.
Drill a new hole next to the screw head to attach the spring. 
Drill a 1/8-inch hole next to the screw secured in the lug. Use the original spring and attach it to the new hole, then stretch it and secure it to the headlight mounting ring. I was able to stretch the spring into place using a wire loop and pliers, pushing the spring over into its original headlight bowl retaining hole when aligned.

All three of my A&R headlight ring-to-casquette retaining screw threads and the outer cover ring retaining thread found in the bottom of the A&R ring were boogered up. I retapped all four to 4mm x 0.7mm and replaced the associated odd collection of as-found screws with new Phillips pan head items.

Anyhow, that's my project. We'll see how long it lasts. But hey, if these lamps hold up on a Sportster?

Friday, November 8, 2019

Where to go with questions about your Royal Enfield

Word cloud of subjects that often come up on Royal Enfield forums.
Know where to go for advice on fixing your Royal Enfield? Here's my list.
Problem with your Royal Enfield motorcycle? Here's a new list of Internet forums to turn to for advice.

This update is necessary because Yahoo plans to wipe out the decades of knowledge accumulated in the Yahoo Groups devoted to Royal Enfields (and everything else) starting Dec. 14, 2019.

In response, some Royal Enfield Yahoo Groups I liked are moving to other platforms. In some cases they will preserve helpful existing files; in other cases it's a matter of starting over from zero.

That's not necessarily as bad as it sounds.

After all, as one group member pointed out, many of the seasoned hands who've fixed Royal Enfield problems in the past are still around to share their experience.

For the answers to technical questions about Royal Enfield motorcycles, I recommend joining the appropriate  message group and asking your questions there. You'll usually find that members are ready and willing to answer common questions, if they can, based on their experience.

To be frank, these Internet forums are at a turning point. It is entirely possible that their role will be taken over by algorithm-driven Facebook, YouTube and Google Search. No doubt, those channels are faster.

At the moment, I prefer the old-fashioned forums for detailed, experienced and sophisticated advice, delivered without sniping and advertising.

Royal Enfield Motorcycles: This is one place an owner of any Royal Enfield can turn to in times of trouble. It is starting all over again on the Groups.io platform. This was the original, worldwide forum of Royal Enfield enthusiasts I turned to when I first purchased my 1999 Royal Enfield Bullet. Since it's starting over from the beginning there isn't much there yet, but join, ask your question and you will get a response.

Bulletech: Members have deep knowledge of the Royal Enfield Bullets common in India so, if you have a Bullet, this is the place for you. The philosophy here is to guide you in learning the answer for yourself, as a true Bulleteer should. If you're not going to enjoy that journey, don't start. This group moved important files to Groups.io when it left Yahoo.

RE Interceptor: Specialty here is the original Royal Enfield Interceptor, but any vintage Royal Enfield twin interests members. This is not the place to go with questions about Bullets or the new Royal Enfield 650 twins. The moderator has rescued important content from Yahoo and relocated the group to Groups.io You'll also find helpful information on the group's website.

Unofficial Royal Enfield Community Forum: Formerly called the ClassicMotorworks Forum. Founded by the one-time U.S. Royal Enfield distributor it is now hosted by Hitchcocks Motorcycles in the UK. Membership still tends to lean heavily toward the U.S. Members seem ready to address any issue, with any Royal Enfield, anywhere. Highly recommended.

Whatever group you join, have your facts laid out when you ask a question, or misunderstandings can ensue. Etiquette is as important as a thick skin when asking questions of knowledgeable enthusiasts on Internet message boards.

Check the little stuff (just a dirty spark plug?) before you bother members.

You will want to avoid alienating the people who might help by asking lazy or inappropriate questions, or failing to first search the group files and past conversations for answers to common questions.

Members get irritated when questioners fail to explain their problem completely or don't state what model and year Royal Enfield they have. Early 1999? Late 1999? Iron-barreled four speed? Five-speed AVL? Unit Constructed Engine (UCE)? These things matter.

Remember, you're getting free advice, and members may disagree about the correct answer. If advice you receive works for you, be sure to write back, thank your advisers, and report that the problem is solved.

And even though there are several helpful groups, resist the temptation to "cross post" your question on more than one of them. Many people belong to them all and don't need to read the same conversation duplicated.

Finally, don't wait for problems to appear before joining these groups. You can learn much (I have) just by reading posts from other people. And if you have a funny Royal Enfield story, the answer to a question, or a particular ride to report, don't hesitate to post. You make these forums fun.

AN OPPOSING VIEWPOINT: Longtime reader John Donlon had this comment on where to get help:

"Buy and read the appropriate factory-issued service manuals for your bikes. These pay huge dividends down the line. On-line forums and YouTube are fine for stuff that needs clarification. I have purchased the actual factory manuals for every bike I've owned and have been able to do much of my own work (mostly preventative maintenance) and saved a lot of money and aggravation.  It is hideous to do "some work" only to discover you've done a lot of damage. Spend the dough and get the right information the first time. It will always be at your fingertips. When I see much of the stuff on the forums I just shake my head and think that yes, there ARE people out there that shouldn't be allowed to own anything. Again; buy, read and comprehend the factory-issued service manuals first."

Friday, June 28, 2019

Avoid buying the wrong Royal Enfield parts on eBay

Two drain plugs with mesh strainers, one longer than the other.
My eBay purchase, top, and what my Royal Enfield needed, bottom.
I got my fingers burned recently purchasing parts for my 1999 Royal Enfield over the Internet from a supplier in India.The parts were cheap and shipping was free.

But I was careless. I ordered the parts impulsively, when I saw the ad on eBay (it was about to expire, so I rushed the purchase).

The dimensions of the parts were described in the ad, but I was traveling and not near my motorcycle. I couldn't compare the measurements in the ad to the stock parts on my Bullet. But they looked so right in the photo. How could they be wrong?

The seller acknowledged my purchase in an email that included this warning:

"Hope you have checked the pictures of the items thoroughly and are sure this will be a usable part for you. If you are unsure about the product, please do contact us within 24 hours of your purchase so that we can make the necessary changes. Different models have different parts compatibility, so please do contact us if you are unsure."

Obviously the seller was suggesting that returns are not welcome. But, again, I had no way to immediately confirm and I easily convinced myself that this part surely would have been unchanged and immutable in design through the life of the iron barrel Bullet.

But when they arrived the new crankcase plugs with strainers were significantly shorter than the ones I later found in my Bullet; only 70mm in overall length, compared to the 80mm ones in my Bullet.

These are part of the oiling system of the motorcycle. I didn't want to risk using the short ones, although I didn't know what difference the length of the strainer could make.

I turned to an expert for advice. Tim, in New Zealand, has generously given of his time and expertise to help me and many others on the Yahoo forums devoted to Royal Enfields. He confirmed my worst fears:

"There are THREE different sump plugs; one metric threaded and metric headed, the other Imperial, the third are after market ones that you have and come from several sources. They vary LOTS!

"The design of the suction strainers is supposed to be of such a length to see the mesh section being slightly compressed upon installation. If not then it is possible for any extraneous matter to be sucked up (carried with oil) into the respective pump disc, damaging surfaces, OR accumulating at cross drillings and blocking of the gallery.

"Mind you, having said that, IF there are such particles in circulation, the motor is not going to last much longer anyway.

"The new short-section strainer mesh drain plugs that you have are at worse (wet sumped situation) a waste of time, and at best (when all is in good condition and operating correctly) ineffective insurance for when any stray particulate from a failing bearing or piston start to manifest themselves."

Tim had other concerns, just looking at the photo of the short strainer plug I got from the seller in comparison to the existing plug from my Bullet.

"The threads are poorly cut," he said of the aftermarket part. "And it only gets worse. Check out the soldering difference of the overlap joint between the two strainers." True. It looks as though the soldering on the new part significantly reduces the area of mesh free to strain oil.

Tim said he has joined the ranks of Royal Enfield owners who have decided to pay more for reliable  results from suppliers like Hitchcocks Motorcycles in the UK.

My unforgivable carelessness might have been curbed if I had at least taken time to look at Hitchcocks website, which offers parts books for Royal Enfields.

In the case of the parts I ordered, I see there that the Royal Enfield Bullet 500 Export oil feed and return filter plug was Part Number 140052 up to December, 2001. After December, 2001, we find drain plug and filter Part Number 144944.

The parts look alike in their photos. Maybe the 2001 change only affected the head, which became a metric size. But at least this would have warned me that there were at minimum two varieties out there.

The eBay seller I bought from has a 98.6 positive feedback rating on eBay. I sent messages admitting my failure to check, and asking if I can exchange the parts.

The response was negative, pointing out that their ad described the parts accurately, as 70mm in overall length. So forget about a refund. They don't have the 80mm length I need, their email said. So forget about an exchange, too.

So: anyone out there want some free Bullet crankcase plug/strainers of 70mm overall length? I'd be interested to know what year Bullet, if any, uses that length.

Tuesday, March 5, 2019

Tim's front brake link-rod adjustment procedure

The Twin Leading Shoe Brake Setting and Adjustment Procedure below is the work of the Royal Enfield enthusiast who signs himself "Tim N.Z." on Royal Enfield message boards across the Internet.

Physics: For the Mechanical Twin Leading Shoe Drum Brake to work with 100 percent  efficiency, the brake levers and their link rod MUST be set as a True Parallelogram!

The greater the divergence from this, the more ineffective the brake will become! The greater the levers' deviation from parallel, and the larger divergence in angularity, the worse the brake becomes!

What is wrong with the method of 2LS brake shoe adjustment described on many web sites?

Most everything.

For the best of misguided reasons (ease of adjustment) owners are advised to drill out one trunnion, to allow independent adjustment of the brake arms.

DON'T DO IT! It is a misinformed method of brake adjustment that has been on the Net in a multitude of places for many years, and was written by some well intended person who had a complete lack of understanding of the functionality of mechanical drum brakes.

In the real world it means that you will be forever readjusting the brake, as one shoe will wear quicker, and one will glaze up sooner than the other, and you will never have 100 percent braking efficiency. With the ongoing "misadjusting" of the link-rod to compensate for the uneven brake shoe wear, lost efficiency is a never ending and ever worsening down-hill spiral.

The degree of accuracy required to accurately set a twin leading shoe brake is just as exacting as that required for setting ignition timing!

To which end, in the case of racing applications, we are talking about 0.002 inches or less in accuracy of measurement!  (Though for typical "road" use we don't need to be quite so particular.)

Once correctly set, the levers should NEVER need to be disturbed again, and braking efficiency will remain optimal.

Before commencing to correctly adjust and set the brake levers, the link rod and the trunnions that the rod screws into must be inspected:  IF either of the trunnions has been drilled-out you will need to buy a new link rod, trunnions, and nuts!

IMPORTANT:
To try to reset brake shoes that have long been misadjusted can prove to be a exercise in frustration due to the unevenly worn or glazed shoes. Often times it is advised to start afresh with a new pair of front brake shoes.

OR: Have the existing shoes fettled by a specialist with the linings radius skimmed back to a true pair.

Even after the brake levers have been correctly set, it can take a few weeks for used shoes to become fully and correctly bedded-in. If the brake remains ineffective after a program of rebedding by means of a series of controlled stops from increasing speed, it is advised to either find a brake shop that can retrue the linings back to a matched pair (see your local brake shop) or buy a new pair of shoes.

With new or reworked shoes fitted, the linings will need to be "broken-in" with a series of controlled "normal" stops with a minimum of a five-minute gap between each application to allow for cooling:

30 mph to a halt five times.
50 mph to 30 mph 10 times.
50 mph to a halt 10 times.

Followed by the same schedule but with max applied lever pressure (emergency stop application) .

Mechanical twin leading shoe brake functions on a very simple principal: Leverage.

The moment the levers no longer function as a true parallelogram, i.e. one lever is set at a greater or lesser angle than the other; you will have more or less pressure (leverage) being applied to one brake shoe, and more or less lift applied to the other.

For a twin leading shoe mechanical drum brake to function with its full potential, BOTH levers MUST be set so that they operate in perfect harmony; balanced leverage. Otherwise over a very short period of time you end up with only one brake shoe with full applied pressure in contact with the drum; thus one shoe is more inclined to glaze, or wears faster than the other.

The situation we are heading to will result in both brake plate levers set "square" to each other.

Both brake shoes lifting of their respective cam face in unison. With the angle of both levers set to be nearing 90 degrees in relation to the foot of the brake shoe.

AND that the angle of the brake cable pulling on the primary-lever (longer of the two levers) is also approaching 90 degrees to its arm.

The optimum point for the exertion of maximum leverage is when ALL of the levers and cams are moving up towards 90 degrees; at which stage you will have attained optimal leverage and thus full braking potential at every juncture in the system. Over-shoot that point and sweep past 90 degrees and braking efficiency drops! So you need to make allowance for future wear.

First step: lightly clean the drum surface with a pot scrubby or fine emery paper. You want a new, clean and fresh surface for the linings to bed onto again

With the brake plate assembly removed from the front wheel, the initial need is to commence by adjusting the external link rod that connects the two brake arms, so that the distance between centers of the trunnions is a nominal 144mm and that BOTH levers are set parallel to each other.

Occasionally, allowance must also be taken into account for "slop" between the trunnions and the brake arms, which will sometimes see one cam or the other commencing to operate before the other even though the theoretically correct distance between the centers has been set correctly.

Front brake plate exterior with brake arms set parallel to one another.
Adjust the external link rod that connects the two brake arms so that
the distance between centers of the trunnions is a nominal 144mm
and BOTH levers are parallel to one another.
Then turn the brake plate over and loosely sit the brake shoes back onto the plate. Closely inspect how the brake shoes sit against the actuating cams. Hopefully BOTH shoes will be sitting square and flat on BOTH of the brake cams. (They frequently do not).

Note: Permanently mark each shoe so that whenever they are removed, they are refitted to the same position on the brake plate! DO NOT swap brake shoes about!         
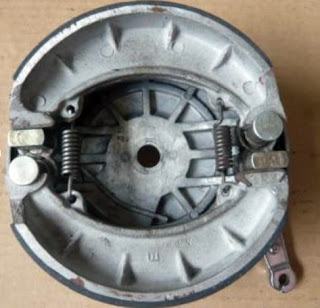
Interior of front brake plate.
...flip the brake plate over...
A tip: With the two levers set as a true parallelogram and centers at a nominal 144 mm (individually check your brake cams to confirm the center distance due to minor manufacturing variations) flip the brake plate over and sit the edge of a 12-inch  steel rule across and between both cam faces. The rule should sit flat and square to both cams at the same time (one edge of the rule on one cam face, the other edge of the rule on the other cam face). If the rule does not sit square on BOTH cam faces at the same time then the splines are not set true to each other; or one cam or lever is advanced/retarded from the other.

Ruler laid across interior of brake plate.
The ruler should sit flat and square to both cams at the same time.
Due to manufacturing tolerances, the precise location of the splines machined onto the external ends of the two brake cams, and the corresponding splines on the two brake actuating arms, may vary slightly. If need be the secondary (shorter lever) brake arm cam be turned over to help optimize spline alignment. Or, rotate either cam 180 degrees as there may be a variation in the face of the cams or the spline teeth on the cam.

Consideration must also be taken into account of manufacturing tolerances between the trunnions and their respective brake arms. Trunnion diameters, and eyes in the brake rod ends vary enough that it contributes additional ‘lost movement’ in the linkages, affecting the "true" length of the top side (the link rod) of the parallelogram. In this situation, set the link rod ever so slightly "long" to take into account the lost-motion "slop" in the system (We are talking less than 0.5mm).

With the correctly assembled and adjusted brake plate refitted into the drum, lightly apply the brake (centralizing the brake plate to the drum and axle), put a drop or two of Loctite on the Brake plate retaining nut threads (taper faced nut) and HAND "snug" tighten the nut. Do NOT over tighten this nut!

When refitting the now fully assembled front wheel into the front forks, ensure that the brake plate retaining nut is positioned HARD up against the side of the fork leg and axle cap. If need be a thin copper washer may be required to shim up any clearance. Having the axle nut flush hard up against the fork leg will prevent it from ever working loose in service.

If ever the brake plate rattles (loose axle nut) you are loosing leverage effect, thus further reducing efficiency.

Final adjustment to ensure maximum brake efficiency is to adjust out 99 percent of free play in the front brake cable, so that the brake shoes are just clear of the drum: Spinning of the wheel should be free and with out any scraping noise resulting from lining and drum making contact.

Excessive free play in the front brake cable seriously detracts from operational efficiency of the brake.

As a check on optimal brake shoe contact, strike a series of diagonal chalk lines (five or six) across the face of both brake shoes prior to refitting the wheel to the bike. Follow the braking bedding in instructions as initially advised, then remove the wheel, and brake plate and inspect the brake linings for signs of the chalk lines. If all has gone according to plan there will be very little residual chalk marks on either shoe.

Minimum acceptable contact area is 80 percent (only 20 percent or less of the chalk lines remain)  for a bedded in brake. But don't get too worried at this time, as it can take several months for linings to fully bed down. Check again after six months.

If you want a SERIOUSLY (racing) good front brake,  there is more that one can check and fettle and will require the use of a mandrel for the brake plate axle hole, plus two dial indicators, to manually "true" the cams with careful hand filing so that they both have exactly the same lift at the linings center point, through no less than 10 degrees of cam rotation.

There is benefit to be had in checking that BOTH of the brake cam pivot holes in the brake plate are on the same Pitch Circle Diameter. Not all brake plates are machined true and square to the axle in this regard. To check PCD,  mount a dummy axle into the brake plate and measure directly to both cam pivots.  If there is in excess of 0.5mm in their PCD it is advised to correct, as shoe-lift will be different. In which event either a new brake plate will be required, or specialized repair.

B0th shoe pivot posts and brake-cam holes should be equidistant from the axle, and that all three reference points are in the same plane.  If the shoes' fixed pivot posts, or the brake-cam holes in the brake plate are off center, then the central axle hole will need realigning (bushing) to match the fixed pivots center, after which both the holes for the cam pivots are checked, and cam lift confirmed.

Don't assume that any new brake plate is correctly machined!

All in all, fettling can sometimes take a couple of hours work, and the wheel can be in-and-out several times. The end result is a brake that is as equally effective as Royal Enfield's single piston disc-brake, albeit with marginally heavier lever pressure.

The all-up cost to have a "perfect" 2LS drum brake? Usually less than the price of a disc brake conversion in both money and time.

Friday, February 15, 2019

How to change motor oil in a classic Royal Enfield Bullet

Containers of clean and dirty oil next to motorcycle.
The owner's manual says my 1999 Royal Enfield Bullet motor holds about 2.25 quarts of oil. But I only got 1.75 quarts of dirty oil when I drained the motor and oil filter housing. 

Changing the oil is the most basic maintenance task I perform for my old-fashioned iron barrel 1999 Royal Enfield Bullet. It's easy! Right? Yeah, well, no, it's not easy. 

I've always made it somewhat easier on myself by changing the oil when the motor is cool. (I live in Florida, so my Bullet motor is always at least warm, never really cold.) I always let the oil drain a long time to make sure as much dirty oil as possible exits the motor. 

But I recall that, years ago, we were always advised to change oil when a motor is hot. It flows faster, we were told. Would fast-exiting hot oil carry away more dirt than a slow stream of cold oil? Maybe. But the real reason probably was just to save time for the mechanic.

This now probably obsolete advice inspired me to try it that way this time; for variety if nothing else.

The fun part of this procedure was going for a run to heat up the engine. I picked a lightly travelled open road and twisted the throttle. Wheee! OK, that's done. After the run I noted that the oil level shown on the dipstick was a little less than half way to the "Full" mark.

Now to undo the two drain plugs at the bottom of the motor. These plugs have suffered from the many times I've opened them in the past, so no socket size in my collection fits either of them well anymore.

This encouraged me to use my fingers rather than a tool to finish undoing the first plug as soon as it would turn.

Ouch! That's hot. So, to undo the next plug I first donned a heavy gardening glove. Heat was now no problem but the instant stream of oil running out soaked the fingers of the glove.

Worse, I then dropped the plug into the basin full of hot dirty oil gathering under the motor. I instinctively reached in — with the glove on — to retrieve it. Decidedly messy.

Once burned, I now decided to let the motor cool thoroughly before attempting to remove the oil filter from its housing near the exhaust down pipe.

With the oil filter eventually removed, I opened the package of a new oil filter. They come wrapped in plastic. I cut one end of this plastic wrapping open and poured in my favorite oil, Castrol 20W-50. With the new filter now saturated with fresh oil I shoved it into the housing as the dripping oil filter lubricated my fingers with oozing oil. What a mess. I closed up the housing.

Next step was to replace the drain plugs in the motor before adding oil. But first...

Two things: I wanted to buy fresh copper crush washers to replace the worn items sealing my engine plugs against oil leaks. I also wanted to measure the amount of old oil I had drained from the engine.

Why? Because no one seems to agree how much new oil an old Bullet should get in an oil change. In part it's the old "every Bullet is different" argument. In part it's the fact that the dip stick isn't much help in the dry sump motor because until the motor runs to distribute oil throughout the motor the amount in the oil tank is almost irrelevant.

And then there are the owners, some of whom insist on shaking the motorcycle from side to side and undertaking other measures (rags on sticks down the filler spout to soak up residual oil!) to get every last bit of old oil out.

And, finally, I am an American.

For me, oil comes in quarts. Not liters. So being told how much oil I need in liters is confusing, even though I know quarts and liters are close to the same size. The owner's manual says the oil capacity of the 500cc Bullet is 2.25 liters (exactly the same amount specified for the 350cc version). That's a little less than 2.5 quarts.

I know from experience that if I try to pour that much oil into my old Royal Enfield Bullet the oil reservoir will overflow! It's obvious that some considerable amount of old oil remains in the motor no matter what I do to get it out. But how much?

I used an old gallon milk jug marked in quarts to determine that the dirty oil I obtained from the motor and the oil filter housing together amounted to only a bit more than 1.5 quarts!

Rocking the motorcycle side-to-side and back-and-forth with the drains open produced a small additional amount of oil. Eventually I got 1.75 quarts of dirty oil out of the motor. So that is the amount I planned to put back into the motor once I got the plugs back in.

But first the washers. Trips to three parts outlets failed to yield copper crush washers of exactly 9/16th-inch interior dimension with an exterior dimension of roughly 13/16ths of an inch. Lucky for me I have a brother who does his own work on cars. He found a couple washers of the right interior dimension and approximate exterior dimension and mailed them to me. Lovely.

New washer next to worn original washer.
New washer, left, knackered washer center, wedding ring, right.
With the new washers in place and the plugs buttoned up I added my 1.75 quarts of 20W-50 Castrol. The dipstick showed that the oil reservoir was now well over the "full" mark. I have no doubt that once the motor has run the level on the dipstick will drop back to a proper mid-stick level.

By the way, "quart" is a Medieval English term, derived from the French for "quarter." However, Canadian French speakers use "pinte" to mean what English speakers call a "quart," while English (Imperial) quarts are different than U.S. quarts and, in the U.S., we have both liquid quarts and dry quarts and they are not the same.