 |
| LED headlamp conversion provides bright light for this 1999 Royal Enfield Bullet. |
Seeking a better headlight for one of his 1999 Royal Enfield Bullets, Californian Mitch Smith installed an LED lamp.
"The LED should hopefully make 10,000-20,000 hours of run-time and be 'totally' immune to vibration. We'll see! These sorts of electrical things usually run either 30 feet or 30 seconds or 30 years.
"All I want it for really is as a fool-proof daytime running light — night riding holds no attraction for me anymore," he wrote.
Like my 1999 Royal Enfield, his Bullet has the U.S.-spec aimable headlight with its special hardware. Since they're only used in the U.S., it can be hard to find information about how to modify these.
Mitch graciously shares his step-by-step procedure and photos below:
There are many 5 3/4-inch LED lights available. Prices are from $20 (U.S.) to $100. Mine ran $40 and was intended for use in a Harley-Davidson Sportster. (If you ever thought your iron-barrel Bullet vibrates a lot, cage a 10-minute ride on a Sporty; that's about all you'll want. The Bullet is a Honda Gold Wing by comparison.)
Our headlights have an adjustment and retaining ring (A&R). This assembly has horizontal and vertical adjusters, three very thick plain "fingers," and a retaining spring lug.
 |
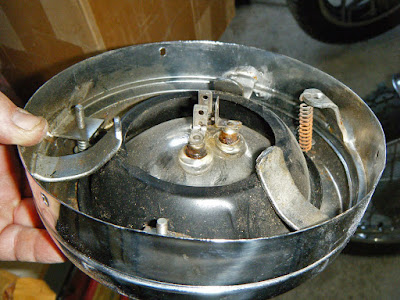
Original U.S. arrangement includes inner bowl, adjusting screws and spring to aim the headlight.
The rear of the inner bowl must be cut off to make a bigger hole for the LED to fit through.
You'll also be cutting off the three long "fingers" that hold the inner bowl in place.
But do not remove the lugs that hold the spring and the two adjustment screws. |
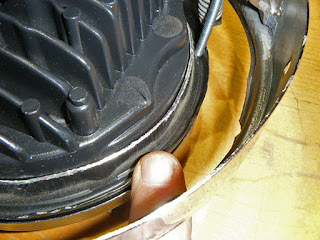
The OEM headlight is sandwiched between a smaller inner thin front chrome ring and a black-stamped shell/bowl. The plain A&R fingers touch the inner shell and provide a bearing surface to allow for headlight aiming. The LED unit is MUCH thicker than the OEM sealed beam, which necessitates some modification to fit.
 |
| The amputated rear of the inner bowl. Discard this. |
Cut off the rear of the black stamped-steel headlight mounting bowl with grinder, leaving about 15mm of thickness to keep ring stable. The hardest part of the whole project was cutting the bowl apart evenly — a thin cut-off wheel would have made life easier.
 |
| Now with a wider opening, the inner bowl accommodates the LED. |
DO NOT cut off the A&R retaining spring lug with the 1/4-inch hole in it. You will need this to create the new "pivot."
Cut off all three of the A&R ring's thick iron plain supporting fingers with the grinder. It was time consuming but straightforward to grind off the straight fingers. The A&R ring is too thin to just "bend and fatigue" these off.
 |
| Remains of one of the plain "fingers" after cutting. Don't try to twist them off. |
Insert LED light into black cut-down bowl, and secure by using the thin front chrome ring and three original screws. You may need a gasket/packing/glue, but mine was snug as is.
 |
The two original aiming screws help locate the LED in the assembly.
Don't cut them off. |
Get a 2-inch-long, 8/32nd-inch screw and nut. Assemble these through the retaining spring lug hole and bend the soft steel screw over as needed to meet the groove in the headlight ring assembly.
 |
Add a screw through the lug holding the spring and secure it with a nut below.
Bend the screw to reach the ring. It won't have to turn, it's there to hold things in place.
Drill a new hole next to the screw head to attach the spring. |
Drill a 1/8-inch hole next to the screw secured in the lug. Use the original spring and attach it to the new hole, then stretch it and secure it to the headlight mounting ring. I was able to stretch the spring into place using a wire loop and pliers, pushing the spring over into its original headlight bowl retaining hole when aligned.
All three of my A&R headlight ring-to-casquette retaining screw threads and the outer cover ring retaining thread found in the bottom of the A&R ring were boogered up. I retapped all four to 4mm x 0.7mm and replaced the associated odd collection of as-found screws with new Phillips pan head items.
Anyhow, that's my project. We'll see how long it lasts. But hey, if these lamps hold up on a Sportster?


Hmm, wouldn't it have been easier just to replace the bulb with an LED one off eBay?
ReplyDeleteI had a factory sealed beam unit, not a reflector/bulb assembly. The incandescent sealed beams are pretty thin compared to the LED replacement assemblies. If you have a bulb-type assembly, I agree that an LED "bulb" would have been the obvious choice.
DeleteI was thinking the same thing David (i.e. LED bulb)! I'm sure you'll have lots more light once everything is in place, but there are LED bulbs that are pretty much plug and play, and aesthetically they would have less impact.
ReplyDeleteAesthetics for me normally takes a back seat to function. If I had a 1950's era actual English-built Reddich Bullet, then I'd likely consider just going with an OEM incandescent bulb to preserve the right color spectrum. For my relatively new Indian Bullet, I just wanted the ruggedest, brightest light I could reasonably find shining reliably out the front of my Chennai built road burner when I'm sharing the street with cars. I use the rubber worm nut seals because they are relatively idiot-proof. For much the same reasons I use Mobil 1 in the engine & Royal Purple 70-90W gear oil in the gearbox. When the OEM control cables fail they are replaced with heavy-duty Barnett units. Eliminate the weak links as you find them and you'll have more riding time and less involuntary wrenching. As far as lights go, all of the turn signals, tail/brake lights, and indicator bulbs will get converted to LEDs. Way less electrical load for the same amount (or more) of light, and much more vibration resistance. You folks that already have bulb/reflector assemblies in the headlight shell are miles ahead of us poor slobs with factory sealed beams in that respect. The anachronism I could replace but intend to keep is the contact breaker points type ignition system. I like the idea of being able to restore the spark in the boonies with a little clean-up & adjustment. Mostly a little periodic attention to the points keeps them happily snapping along, and a spare pair & condenser don't take up much room. An electronic system requires 100% spares if you are intending to ride home and can't call the tow truck. My points I can gap & time using eyeballs, hand tools and a thin 6" straight twig.
Delete"Night riding holds no attraction for me anymore." Me too, Mitch, me too...
ReplyDeleteInterested to read that no one has mentioned that the lighting circuit on older Indian bullets is AC so to run L.E.D. you would have to run through a rectifier to get DC,or does American sold bikes have a DC headlight circuit? Rest of the world please check first before you buy.
ReplyDeleteAccording to the Snidal manual, there was a transition period in mid-1999. All-DC lighting was earlier, AC headlamp & indicator lamp was later. My LED equipped bike luckily has the earlier 12VDC lighting, the later bike has the AC headlight system. There is an AC regulator specific to the headlight. Interestingly, Hitchcocks shows the same DC voltage regulator/rectifier (R/R) (P/N# 145377) from 1995 to at least 2002, covering both systems. The all-DC machines have 3 wires exiting the stator; violet, green & white. The violet & green combine, and only 2 A/C wires (green & white) enter the R/R. The A/C machine has 4 wires: 2 x violet, yellow & amber. The 2 violet wires feed the R/R. Yellow & amber run the headlight. My plan is to see if yellow & amber are in phase with the two violet wires. if so, they can be paralleled and the system converted over to DC using the existing R/R. If not, as was pointed out a 50W+ rectifier could be added between the yellow feeding the headlight switch and the amber "neutral/ground" leg. Rectifier output DC wires would have to then feed the headlight switch and be plumbed into the headlamp & high beam indicator lamp "ground" circuits. The pictures of the 3-wire alternator show two paralleled, 3-coils-in-series circuits. This would be a "common" and the two "hot" legs that get paralleled later. The 4-wire may be essentially the same thing but with two isolated sets of seriesed coils. The voltage & phasing tests will prove that one way or the other. As a separate issue, many DC devices have a rectifier built in to them as "reverse polarity" protection, which allows them to run on AC of the correct voltage. The LED headlights may indeed be fine on 10 - 30 VAC. We'll need to find a volunteer, though.... -Mitch-
Delete