Showing posts sorted by relevance for query oil change. Sort by date Show all posts

Friday, February 14, 2025

Why do I enjoy oil changes so much?

 I changed the oil in my 1999 Royal Enfield Bullet. It's not clear to me when was the previous time I changed it. 

The last note I made of an oil change was just about exactly two years ago. That may be accurate. 

Well, I don't ride as much as I used to when I was a commuter. 

Anyway, the amount of oil regularly added to the motorcycle between changes (a lot) probably amounts to a sort of running oil change. 

The oil always gets black immediately on use; probably just the result of an old, unsophisticated motor.

Certainly the drained oil this time was very black. I didn't notice any silvery bits of metal in it but, then, I forgot to look closely. 

I didn't get the bucket properly positioned under the drain when I opened it, so there was a mess on the floor. Fortunately I had the motorcycle parked on cardboard, which soaked up most of the spill.

Then I spilled more oil just getting the multi-part oil filter out. It's not a spin-on. More like an athletic sock stuffed inside a kitchen sink strainer.

It should be returned to its housing soaked in clean oil. Getting it soaked was another mess on the floor.

And then I spilled still more oil emptying the bucket into an old plastic bottle to take to recycling. The funnel I'd chosen to use in this process had too small a spout, so it instantly overflowed. Luckily, again, onto the cardboard.

I went and got a bigger funnel.

The final spill (so far) came while putting clean oil into the oil tank. The oil compartment doesn't hold the full amount of oil specified in the owner's manual, so it overflows.

It's my theory that the oil has to be distributed into the filter and around the motor while running before there's room to get in the full proper amount of oil.

So there remain opportunities to spill yet more oil, in topping up. 

Luckily I make a practice of saving all the big cardboard that comes into the house. I will need it.

As a commuter, before I retired, I did oil changes regularly and I became pretty skilled at it.

Of course my practice then was to change the oil the night before I would ride to work in the morning.

That is the reason I didn't immediately go for a ride after this latest oil change: I don't associate changing the oil with immediately riding.

There is a satisfying feeling to having the job done. Yet more opportunities for satisfaction remain.

The gearbox oil is in a separate reservoir, and could use changing. The primary drive case requires another, separate, oil change.

Then the oily job of lubricating the final drive chain is certainly overdue.

 I feel as though I am saturating more cardboard than I am saving oil to be recycled. All this maintenance may be good for the soul, but not for the garage floor.

Friday, February 15, 2019

How to change motor oil in a classic Royal Enfield Bullet

Containers of clean and dirty oil next to motorcycle.
The owner's manual says my 1999 Royal Enfield Bullet motor holds about 2.25 quarts of oil. But I only got 1.75 quarts of dirty oil when I drained the motor and oil filter housing. 

Changing the oil is the most basic maintenance task I perform for my old-fashioned iron barrel 1999 Royal Enfield Bullet. It's easy! Right? Yeah, well, no, it's not easy. 

I've always made it somewhat easier on myself by changing the oil when the motor is cool. (I live in Florida, so my Bullet motor is always at least warm, never really cold.) I always let the oil drain a long time to make sure as much dirty oil as possible exits the motor. 

But I recall that, years ago, we were always advised to change oil when a motor is hot. It flows faster, we were told. Would fast-exiting hot oil carry away more dirt than a slow stream of cold oil? Maybe. But the real reason probably was just to save time for the mechanic.

This now probably obsolete advice inspired me to try it that way this time; for variety if nothing else.

The fun part of this procedure was going for a run to heat up the engine. I picked a lightly travelled open road and twisted the throttle. Wheee! OK, that's done. After the run I noted that the oil level shown on the dipstick was a little less than half way to the "Full" mark.

Now to undo the two drain plugs at the bottom of the motor. These plugs have suffered from the many times I've opened them in the past, so no socket size in my collection fits either of them well anymore.

This encouraged me to use my fingers rather than a tool to finish undoing the first plug as soon as it would turn.

Ouch! That's hot. So, to undo the next plug I first donned a heavy gardening glove. Heat was now no problem but the instant stream of oil running out soaked the fingers of the glove.

Worse, I then dropped the plug into the basin full of hot dirty oil gathering under the motor. I instinctively reached in — with the glove on — to retrieve it. Decidedly messy.

Once burned, I now decided to let the motor cool thoroughly before attempting to remove the oil filter from its housing near the exhaust down pipe.

With the oil filter eventually removed, I opened the package of a new oil filter. They come wrapped in plastic. I cut one end of this plastic wrapping open and poured in my favorite oil, Castrol 20W-50. With the new filter now saturated with fresh oil I shoved it into the housing as the dripping oil filter lubricated my fingers with oozing oil. What a mess. I closed up the housing.

Next step was to replace the drain plugs in the motor before adding oil. But first...

Two things: I wanted to buy fresh copper crush washers to replace the worn items sealing my engine plugs against oil leaks. I also wanted to measure the amount of old oil I had drained from the engine.

Why? Because no one seems to agree how much new oil an old Bullet should get in an oil change. In part it's the old "every Bullet is different" argument. In part it's the fact that the dip stick isn't much help in the dry sump motor because until the motor runs to distribute oil throughout the motor the amount in the oil tank is almost irrelevant.

And then there are the owners, some of whom insist on shaking the motorcycle from side to side and undertaking other measures (rags on sticks down the filler spout to soak up residual oil!) to get every last bit of old oil out.

And, finally, I am an American.

For me, oil comes in quarts. Not liters. So being told how much oil I need in liters is confusing, even though I know quarts and liters are close to the same size. The owner's manual says the oil capacity of the 500cc Bullet is 2.25 liters (exactly the same amount specified for the 350cc version). That's a little less than 2.5 quarts.

I know from experience that if I try to pour that much oil into my old Royal Enfield Bullet the oil reservoir will overflow! It's obvious that some considerable amount of old oil remains in the motor no matter what I do to get it out. But how much?

I used an old gallon milk jug marked in quarts to determine that the dirty oil I obtained from the motor and the oil filter housing together amounted to only a bit more than 1.5 quarts!

Rocking the motorcycle side-to-side and back-and-forth with the drains open produced a small additional amount of oil. Eventually I got 1.75 quarts of dirty oil out of the motor. So that is the amount I planned to put back into the motor once I got the plugs back in.

But first the washers. Trips to three parts outlets failed to yield copper crush washers of exactly 9/16th-inch interior dimension with an exterior dimension of roughly 13/16ths of an inch. Lucky for me I have a brother who does his own work on cars. He found a couple washers of the right interior dimension and approximate exterior dimension and mailed them to me. Lovely.

New washer next to worn original washer.
New washer, left, knackered washer center, wedding ring, right.
With the new washers in place and the plugs buttoned up I added my 1.75 quarts of 20W-50 Castrol. The dipstick showed that the oil reservoir was now well over the "full" mark. I have no doubt that once the motor has run the level on the dipstick will drop back to a proper mid-stick level.

By the way, "quart" is a Medieval English term, derived from the French for "quarter." However, Canadian French speakers use "pinte" to mean what English speakers call a "quart," while English (Imperial) quarts are different than U.S. quarts and, in the U.S., we have both liquid quarts and dry quarts and they are not the same.

Friday, December 3, 2021

Here's an easy way to change oil in a Royal Enfield

Royal Enfield Bullet next to two oil jugs.
Why two big jugs of oil? One is empty so I can premeasure the oil to be added.

 It was time to change the oil in the motor of my 1999 Royal Enfield Bullet.

 I specify that it was time to change the oil in the motor because my old Royal Enfield also has oil in the gearbox and another kind of oil in the primary drive. Those would have to wait for next time; changing the oil in the motor is enough for one day.

 The motor alone has two drain plugs, not one, as you might expect. The oil filter is not a handy spin-off cartridge, but an oil soaked felt tube that must be inserted, dripping oil, into the motor.

But first the old oil and the old dripping filter must be removed. The first step in doing that is to round up every spare rag in the house, because I knew I was going to need them.

New oil filter gets a dunk in clean oil.
New oil filter gets a bath in clean oil before insertion.

The manual says the motor wants 2.25 liters of oil. I only understand "liters" as a measure of Coca-Cola. As in "one liter bottle of Coca-Cola will have lost all its fizz before I finish half of it."

So it was also time to renew my acquaintance with how many quarts there are in a liter, how many quarts there are in a gallon, how many cups there are in a half-gallon and how many cups there are in a quarter of a quart.

Luckily I have a system for this: I just ask my wife. She does all our cooking, so she is familiar with liquid measures.

The good news, for me, is that 2.25 liters turns out to be just a short distance from 2.25 quarts. Call it even. Easy!

And, as usual, I had a strategy in mind to make changing the oil even easier.

I always have a strategy for changing my Royal Enfield's oil, every time I do it. Just never the same strategy as, so far, no strategy has worked out very well.

Pouring oil from one jug into another.
I premeasured the oil by pouring it into the empty jug.

This time the great innovation would be that I would first measure out the amount of clean oil to be added to the motor once the old goo had vacated. This would avoid having to rely on the Royal Enfield dipstick, which I've discovered is wildly unreliable.

Why this should be so probably has to do with all the places oil has to find its way around to inside the Royal Enfield motor. If you fill an old Royal Enfield's oil tank to the "Full" mark on the dipstick, and go for a ride, you will find little or no oil showing on the dipstick next time you check.

More oil has to be added to the tank to account for the oil that gets distributed. More, but how much? There's no way to know.

Ah hah! You see, this time, with my 2.25 quarts of oil premeasured I would be able to fill the oil tank, to the Full mark on the dipstick, conserving whatever was left over in my container, and then, after the first ride, add the left overs to achieve the perfection of exactly 2.25 quarts circulating inside the motorcycle.

Oil jug marked for 2.25 quarts.
Oil jug includes a handy "window" to measure quantity.
Quarts on the left, liters on the right. Notice how close they are.

Minus whatever leaked out or got spilled, of course.

It didn't really work out. In my struggle with liquid measure I mistakenly marked my jug at the 2.5-quart mark instead of 2.25. I had pre-measured too much oil! Adding the remaining amount after the first ride would be a quarter of a quart too much. I would have to adjust.

I'll do it right next time.

Friday, October 30, 2026

Don't overthink changing Royal Enfield oil

Measuring old oil drained from Royal Enfield.
By actual measure, you will get only 1.5 quarts of dirty oil from an old Royal Enfield Bullet.

 Incredibly, I disregarded my own advice, given in this column. Scroll to the end to learn the price I paid. 

What was it I used to find so fulfilling about doing an oil change on my 1999 Royal Enfield Bullet 500? 

I did a lot of oil changes, when I was a commuter, racking up 250 miles a week. 

You could say I just got so good at it that it was easy. 

But this was never true, and my garage floor still shows evidence of repeated oil spills from those days. 

Something always went wrong. 

Like the time I forgot to put the drain plugs back in place before adding new oil.

The most common mishap was that I would try to add the designated 2.25 quarts of fresh oil, and the oil tank would overflow.

This prompted me to wonder just how much oil I really needed to add.

Well, how much was I really getting out? My discovery, verified today, was that, left to drain for 24 hours, with both plugs pulled and the oil filter removed, only 1.5 quarts emerge to fill the catch  pan.

A (dirty) quart of oil apparently remains in the motor, where I will never see it.

Remember my mention of the time I failed to insert the plugs before adding oil? I vividly recall that the stream of oil that suddenly cascaded onto the floor was not instantly clean oil, but rather the inky black of old oil, forced out by the stream of new oil.

So, obviously, some old oil does remain in the oil tank, past the point where the dip stick can reach it.

Wooden dowel poked into oil tank.
Dowel poked into oil filler finds 1/4 inch of old oil still there.

As an experiment, today I poked a clean wooden dowel into the supposedly empty tank and found about 1/4 inch of old oil remaining. How much is that?

I was afraid you'd ask. So I tried to find out. And failed.

Using a squeeze bulb got out only a few drips, and the old trick of using a drinking straw as a pipette didn't work either.

Use squeeze bulb to remove oil from tank.
Squeeze bulb recovered only a few drips of oil.

This much I know: it took approximately 1.5 quarts of new oil to bring the level on the dipstick back up to near the "H" mark. You don't want to overfill it for fear of wet sumping.

Bottom line, get some fresh oil in there. Start with 1.5 quarts, run the motor and check the dipstick.

It's not rocket science. It's just a mess.

Here's what happened: After carefully adding back into the motor ONLY the amount that I had drained during this oil change, I fell victim to my own over caution. Preparing for the next ride I observed that the oil was only partway up the dipstick and I stupidly added an additional pint of clean oil. Naturally the Bullet wet sumped, producing a persistent cloud of smoke.

Royal Enfield Bullet in cloud of smoke.
Proof that i should have listened to my own advice!


Friday, October 18, 2019

There's a trick to changing Royal Enfield gearbox oil

Collection of tools and supplies for changing gearbox oil.
Pan and absorbent paper to catch spills, wrenches and a clean, empty plastic bottle with a squirt lid.
I decided to change the gearbox oil in the old-fashioned Albion four-speed gearbox of my 1999 Royal Enfield Bullet.

My gearbox is a separate unit. The transmission is not packaged to share oil with the motor, as it is in modern Royal Enfield motorcycles.

That means my gearbox oil didn't get changed every time I changed the motor oil. No. In fact, over the years, there never seemed to be any reason to change it at all!

For one thing, my old Bullet used to leak heavily from the gearbox. The side behind the primary drive mechanism — and therefore out of sight and out of reach — apparently wasn't sealed correctly.

Eventually a mechanic fixed that, fitting a proper sealing ring. But until that happened, everything I put into the gearbox was soon flung out, onto the motorcycle. What a mess.

Of course this made for the continual necessity to "top up" the gearbox with new oil. In failed attempts to keep it from pouring out I experimented with all kinds of ever thicker lubricant: Lucas oil, gear oil, grease ("elephant snot") anything that seemed likely to stay put. Of course, nothing did.

But once the seal was installed, the gearbox became virtually maintenance free. I can't remember ever draining and refilling it, in more than 42,000 miles of riding.

The time had come.

Oil drip on drain plug.
View from below: drain plug obviously leaks a bit.
To my surprise, not much came out when I removed the drain plug at the bottom of the gearbox. Perhaps, since the oil seemed to be staying in, I had allowed the level to get low. (There was a slow drip from the drain plug I had always ignored — shame on me.)

Now, only one cup of old oil came out. Probably the grease I'd shot into the thing is still in there, never to emerge. So how much oil to put back in?

Measuring cup of dirty oil next to gearbox.
Only one cup of dirty oil came out.
Luckily this is not a problem. In addition to the drain plug on the gearbox bottom there is a filler plug on top AND a very handy plug on the side. You fill the gearbox with oil until it drains out of the side opening. Those old-time designers were clever.

Plug and opening in front side of gearbox.
Plug opening on front side of gearbox will weep oil when gearbox is at correct level.
Since one cup of oil had come out, I would start with one cup of fresh oil and add more as needed to reach the side opening.

But what kind of oil?

I'd been "topping up" with Castrol 20W-50; conveniently enough that's the oil I use in my motor. But I'd recently read a note on the Royal Enfield Interceptor Yahoo group that gave me pause. Modern "EP" (Extreme Pressure) oils may contain additives that damage the old-fashioned gearboxes, it said.

Luckily another member of that forum immediately chimed in with this reassuring message:

"Experience shows that the original bushes tolerate the Castrol EP nicely. The EP is essential for the life of the gear-wheels! They don't stand a chance with ordinary, modern engine oil, i.e. without the EP additives. I have a box full of pitted gearwheels to prove the point."

Chris Overton, a Royal Enfield enthusiast on the Interceptor group, also assured me that I was on safe ground.

"20W-50 will work just fine, and I use it," he wrote. "Even better is 85W-140 gear oil. The product I buy here is extreme pressure (EP) and comes in a round, one-liter bottle. It has a pointy spout so you can squeeze it directly into the gearbox without using a funnel. Don't let the higher viscosity number confuse things. Engine oil like 20W-50 has viscosity measured at 300 degrees, its temperature in a hot engine. Gear oil has viscosity measured at room temperature so gives a higher number."

Looking into opening we see that it is not very deep.
See why you can't use a funnel to add gearbox oil?
Metal just below the opening keeps the funnel out.
He added: "A good check to do on any drained oil is to tip the drain pan slowly side to side in bright sunlight, looking for any sparkle of metal flake. You are not likely to see any but, if you do, it is a warning," he added.

Checking, I did indeed see golden sparkles in the oil. But they were minute and I figured that they probably represented normal wear in more than 40,000 miles of city riding, with the gearbox in constant use.

So now all I had to do was refill the gearbox. First I rubbed a bar of soap against the threads of the drain plug, to provide a barrier against that slow leak I'd noticed, and reinstalled it.

Of course, my container of new 20W-50 oil doesn't have the "spout" Chris suggested. So I carefully cleaned out a plastic dish-soap container to use for squeezing oil into the gearbox. I poured my one cup of fresh oil into it and went to work.

Plastic bottle of new oil above filler opening.
It worked! Squeezing the plastic bottle slowly and gently inserted oil without a drip.
I admit I expected this to fail. The reason you can't just use a funnel to add oil to the gearbox is that the opening only goes in a very short distance before making a very tight turn. The nose of the funnel won't go far into the opening and the oil quickly backs up and slops over the exterior of the gearbox and on to the floor.

But Chris was correct. My squeeze bottle shot oil into the hole under enough pressure to make the turn without backing up and overflowing. When I stopped squeezing, the plastic bottle puffed out, creating suction that practically stopped the flow of oil out its tiny nozzle, and giving the opening time to clear before I gave it another shot. A great trick!

Oil drools out of opening in front side of gearbox.
Overflow from the side hole told me the gearbox oil was now at correct level.
Using this method I was able to get about 1.25 cups of oil into the gearbox before it began weeping out of the side, "indicator" hole.

I replaced the top and side plugs and declared the job done. Now for a test ride.

But before I did that I wanted to try one more thing. Yup. If you don't want to bother using a separate squeeze bottle, as I did, the top of the soap bottle I used fits just fine on the Castrol 20W-50 container. I could have just used it to squeeze oil into the gearbox.

Plastic bottle cap with squeeze opening.on Castol oil bottle.
You can skip cleaning out a dish soap bottle and just put its lid directly on your plastic oil bottle.

Friday, September 26, 2014

How to find the model year of Indian Royal Enfield Bullets

How can you determine the model year of an early made-in-India Royal Enfield Bullet? It's probably the most common question I'm asked and it's very hard for me to answer.

But here's help.

The chart below is the work of the Royal Enfield enthusiast who signs himself "Tim N.Z." on Royal Enfield message boards across the Internet.

Tim posted his chart on the Bulletech Yahoo Group, an online forum with many Indian members, who, of course, are most likely to be the ones with questions about their motorcycles.

Enthusiasts around the world should be grateful as well.

Collectors, whether in India or elsewhere, place a higher value on the made-in-England Royal Enfields, and on those early Indian-made Bullets that at least included British made parts.

As Royal Enfield in Redditch, England wound down in the 1960s there was less and less of this and, eventually, Bullets were made completely in India.

Many thousands of these purely Indian Bullets exist and the temptation to restore them as counterfeit British motorcycles naturally exists as well.

Cosmetic items are easily changed and motor and frame numbers can be altered. Old looking (but cosmetically restored) Royal Enfield Bullets often appear on eBay and CraigsList in the U.S. identified as genuine British motorcycles. Asking prices for these are very high.

Tim's chart is intended to look beyond outward appearance and motor and frame numbers. He withheld some of what he knows rather than tip off counterfeiters.

"I hope it may be of use for you, and also to others, to help with the positive identification of the older Indian made Bullets," he wrote me.

(Note: years noted are model years, and are not necessarily calendar years.)

1956
June 1956 G2 37XXX last fully complete English-assembled Completely Knocked Down (CKD) bike is shipped to Madras. EI numbering sequence commences with G2 37XXX EI 5XXX. Ignition by SR1 magneto and 6-volt "hex" alternator, replacing former mag/dyno.

1956/7
Indian made Type 1 modified frame construction commences on tooling supplied by Redditch factory. It's a simplified version of the English made frame no longer using the cast frame fork-head; instead frame was made from all tubular metal, and welded. CKD motorcycles sent to Madras no longer include a British made frame. Mudguards and tool boxes now also produced in India.

From 1956-'62 the Indian Bullets used the locally made frame (Indian Type 1) with curved loops that connected the lower seat tube to the swingarm bracing gussets.
1960
Introduction of points ignition; coil located inside right hand tool box.

1962 (late)
Type 2 frame production commences. Modified rear frame loops to the lower saddle tube, now straight and bolted up through lower end of saddle tube. Entailed use of longer top gearbox mounting plates. (This is the same construction style as latest frames).

From 1962 onwards the Indian frame was further modified to the form (Indian Type 2) we still see today: Straight tubes up from the swingarm gusset plates, with the long through bolt above the gear box, and extended top rear gearbox mounting brackets. Note the absence of the forward solo seat mount? The front solo-seat mount is a feature that was later reinstated.
1964 (April)
Last English made CKD bikes supplied to India. All frames now the Type 2 (Indian) manufacture. All bikes are now fully built in India from local and imported components

1965
Indian made crankcase commences from engine number G2 66XXX EI XXXXX. Addition of crankcase number (actual Indian crankcase number) added underneath the engine breather boss on drive side of crankcase. This additional number has a constant difference factor relative to the G2 and EI sequence numbers

1968/9 (circa)
G2 numbering sequence changed, B prefix introduced, along with a number/letter suffix denoting year/month. EI Numbers continued along crankcase side.

1972
Wheel bearings changed from Imperial to metric (6203) from engine number B 113545 2JX.

1973
X suffix added to crankcase engine number. Denotes the change over from Imperial to metric bearings and the replacing of the former built-up timing side roller bearings with a caged roller bearing. Deletion of oil return pressure relief valve. All return oil now passes over cylinder head.

1974
EI numbering sequence ends.

1975
Last English made part (con rod) supplied to Madras. Henceforth bike is completely indigenous manufacture.

1977
350 Bullets imported into UK. Half-width hubs front and rear wheels, 6-inch single leading shoe brakes, Villiers carb, "one key fits all" ignition lock mounted in right hand tool box. 6-volt electrics, with emergency start provision to run directly off alternator. Pressed mudguards of deep section. All bikes painted red. Dual seat standard.

1980
Ignition coil mounting moved to the fixed section of the rear mudguard from inside the toolbox. May, 1980 alternator stator previously fitted onto an adaptor ring now attached direct to chaincase.

1981
Fulcrum lever added to the center stand makes the center stand easier to use. Center stand  previously retained by two nuts now retained by split pins and washer. Oil pump covers changed to Pressure Die Cast and reinforced with ribbing to increase their strength. Rear wheel changed to quick detachable (QD) type with the sprocket fixed to the swingarm. Early models had a small rear hub to which the sprocket was attached on one side and the speedo drive attached on the other side. X suffix dropped from engine number. Speedo hub drive shifted to the front wheel to allow for the new QD rear wheel. New rear shock absorbers with adjustable spring rating (previously non-adjustable). A German designed Bing carburetor giving improved fuel efficiency replaces the Villiers carburetor. 19,512 motorcycles produced.

1982
Crankcases are paired and in-line bored (timing side and drive side crankcases are bolted together then the bearing holes are made in one operation). This avoids offset bearing bores and eliminates main bearings failure. Engine/frame number gains a number prefix denoting year of manufacture. Petrol tank filler hole enlarged and a larger round filler cap introduced. Front fork with integral oil seals replaces earlier screw type seals. Pressed steel handlebar levers with curved ends. New combined dip switch/horn unit with plastic horn button replaces metal button, which sometimes shorted in wet conditions. Deep rolled front mudguard replaces flat-sided pressed mudguard. Bike lifting handle fitted to drive side. Winged petrol tank badge has ENFIELD (previously ENFIELD INDIA). Individual ignition keys introduced for the ignition unit on the timing side toolbox (previously a one-key-fits-all unit was used). Black plastic ENFIELD cover for the contact breaker unit (previously a painted metal cover). 222,225 motorcycles produced.

1984
Four-plate rectifier replaces eight-plate rectifier. Finned, chrome-plated tappet chest cover replaces plain alloy cover. Front brake and clutch levers chrome plated (previously black).

1985
Trafficators (turn signals) introduced. These work with the bike's 6-volt electrics.

1986
Twelve-volt electrics introduced  (previously 6 volts).

1987
Mikarb carburettor introduced, replaces Bing carburetor. Long silencer fitted to new export 500ce Bullets now also fitted to 350cc export bikes.

1988
New export-only 500cc Bullet released. Long silencer fitted to all export bikes. (Note: very few 500s were made in 1988.)

1989
Low rider/high pillion dual seat introduced on export models. Domestic models retain the early flat dual seat.

1990
Oil pump cover screws changed to metric (previously Whitworth). Engine/frame number gain a letter suffix denoting month of manufacture.

1992
Horn location changed to front facing from side facing. Five-ampere battery replaces 5.5-ampere battery and battery top cover changed to Fiber Reinforced Plastic on 500cc Bullets.

1993
Folding kickstart crank introduced (previously a fixed type used). Rubber guides introduced on front mudguard to route the speedo and front brake cables (?) to avoid cables fouling the mudguard. High beam and turn signal indicators relocated inside the speedometer (previously positioned in the casquette facia). Cylinder head valve guide and valve seat housing now inline bored. 325cc diesel introduced in November.

1994
Twin leading-shoe front brake introduced on domestic Bullets. Ignition key moved to casquette from right-hand toolbox. Headlamp switch moved from casquette to left handlebar electrics cluster. Left-foot gear change for the U.S. market.

1995
Lockable toolboxes fitted (Coke-bottle-top shaped fasteners formerly employed). Front fork triple-lip oil seal introduced (previously a double-lip seal). Rectifier and regulator become two separate units (previously a one-piece unit (?). Neoprene seal fitted to big end oil pump worm nut (replaces cork oil seal). Three-piece clutch rod introduced (formerly a two-piece rod was used). Clutch center and plates redesigned. Note: you must use old shape center with old shape plates and new center with new shaped plates. A mounting strip is incorporated into the frame for the rectifier/regulator/flasher unit positioned underneath the dual seat. Common key introduced for the ignition switch, toolbox locks, petrol tank and steering lock. Valve guide material changed from phosphor bronze to cast iron for improved life . Lightning model introduced in 350, 500 and 535cc. Many internal changes for the 535cc engine: larger piston, and oil pumps being the most noticeable.

1996
Rocker bearings with double pins and ground stud locators introduced (replaces early free-floating bearings). Pulse Air Valve (PAV) emissions control system introduced on all export and domestic 500cc Bullets except for U.S. models. Silencer bracket becomes separate (previously welded to the silencer). Electrics changed from DC to AC/DC in 350cc Deluxe models for improved reliability and brighter headlamps. 21,621 motorcycles produced.

1997
Warranty on domestic Bullets brought in line with export machines: one year or 10,000 km previously six months and 8,000 km. Larger 28-notch rear chain adjusters introduced (previously 23 notches). Royal Enfield motifs introduced on export model petrol tanks replacing Enfield logo.

1998
Air filter moved from air filter box to right-hand side toolbox on export models. Crankcase breather diverted into a breather oil collection box and recycled into crankcase on export models (previously sprayed oil onto rear chain). Silencer baffling increased to meet future noise emissions legislation. Push-pull type choke knob introduced on 350cc carburetors for ease of operation. Electrical connections changed to coupler connections from bullet connectors for better connectivity. Bonded brake shoes introduced on the rear brake (previously riveted). Shielded ball bearings fitted in front and rear wheels replace traditional unshielded ball bearings for improved life. One pair of additional friction and metal clutch plates fitted to the 350cc clutch for better transmission of power.

1999
Round turn signals introduced (previously rectangular on domestic bikes; the front ones attached directly to the casquette, center line with the head lamp). Electrics changed from DC to AC/DC on all models for improved reliability and brighter headlamps. Royal Enfield logo on all rubber parts, i.e, foot pegs, kickstarter rubber, gear lever rubber etc. (previously Enfield). A 350 Machismo released. All new motor designed by AVL in Austria, with new barrel and head, CDI ignition, new crankshaft with steel con-rod and roller big end bearing, gear oil pumps inside new timing cover. Revised cam lubrication; camshafts no longer flooded. Internal drillings drain timing cover oil to return oil pump then back to oil tank. CV carb, optional disc front brake.

2000
Push rod adjusters changed to metric (previously Whitworth). Oil seal fitted to timing-side of 350cc crankcase where the timing shaft comes out, to reduce wet sumping. Crankcase and chaincase fasteners become metric (previously Whitworth). Foot peg rubbers design changed to ring groove pattern

2001
Rolled front and rear mudguards are fitted to domestic 350 Bullets (replaces pressed guards). Duck bill type centrally mounted side-stand introduced on domestic models (replaces rear-mounted side-stand). Final drive sprocket nut fitted with a neoprene seal to prevent grease escaping from the gearbox (replaces felt seal). Long silencer introduced for domestic models. Air filter moved from air filter box to toolbox on domestic models. Crankcase breather diverted into a breather oil collection box and recycled into crankcase on domestic models (previously sprayed oil onto rear chain).
New type integral steering lock introduced. October 2001, electric start available for export models.

2002
Chromed cover for contact breaker points introduced replaces black plastic cover. Electronic Ignition (CDI) introduced on domestic Bullet 350cc. Five-speed left foot change gear-box available on domestic bikes. Hex headed metric sized bolts used to fasten the engine to the frame at the front replaces studs and nuts. Oil pressure relief valve fitted in the timing shaft and increased volume oil pumps fitted to 350cc Bullets up-rate the 350cc bike to 500cc Bullet specifications. Pillion footrests become foldable on 350cc domestic Bullets. Royal Enfield motifs used on domestic model petrol tanks replace Enfield logo. Engine and clutch fastening studs and nuts changed to metric from Whitworth. O-ring rear chain introduced for domestic bikes for increased chain and sprocket life. Optional disc brake available on Electra

2003
Rubber shield bearings used in both wheels increase longevity. Handlebar vibration dampener introduced on domestic Bullets to reduce rider fatigue. Flanged bolts and nuts used on frame mountings. Front brake cam modified and new brakes shoes fitted. Throttle cable modified. Modified clutch assembly introduced. TCI ignition introduced on 350 Electra. Improved valve seats (hardened) fitted to all Bullets. Stellited exhaust valve fitted. Mudguard mounting screws changed to stainless steel. Heavier fly-wheels fitted to 350cc – same weight as 500.

2004
New Sixty-5 model released. Features electric start mounted to the lower front of the cylinder barrel, and driven through a sprag bearing and an idler gear to the crankshaft, five-speed left-foot gear box, revised air-filter and tool boxes, gaiters fitted to front fork stanchions. New twin seat, with revised padding and covering. All new primary cover, inner and outer to incorporate electric start.
Available in purple, red, silver or black. Chrome springs on rear shocks, revised shock absorber top covers (shorter).
AVL engine Machismo 350, new single seat and pillion pad, flat-sided tool boxes.
Prototype Electra-X first shown. Similar to the domestic market AVL 350: New barrel and head incorporates rockers, new crankshaft with steel con rod and roller big end bearing. New timing cover with gear oil pumps. Decompressor deleted, and a valve lifter fitted instead (operates via exhaust pushrod off the tappet inspection cover). Gas shock absorbers, disc brake standard, New front mud guard. All new air-filter assembly and tool boxes. Features the new electric start.
Rear guard stays deleted, revised rear guard, CV carburetor, handlebar switch gear upgraded. New modern alternator and voltage control.
All Bullets now fitted with revised cam pinions to match those fitted in the Electra (smaller diameter ends). Domestic bikes have new frame with revised pillion foot peg mounts. Revised engine breathers, now off top of oil tank. Engine oil dip stick changed to screw-in type from press-lock bayonet fitting. In conjunction with changed crankcase breathing, engine now breathes through top of oil tank and altered fume catch can with oil drain back into timing cover.

Friday, October 29, 2021

Want no-mess oil changes? Get an electric motorcycle

Three-wheeled electric car.
When it's built, the Daymak Spiritus three-wheeler won't need oil changes. 

 Want to streamline the process of changing the oil in your classic Royal Enfield motorcycle?

 After lengthy experiments with coffee cans, milk jugs and drain pans, here are my picks for the two best ways to clean up your act when changing oil:

1. Pay someone else to do it for you; or

2. Buy an electric motorcycle. No more oil changes!

 I've blogged repeatedly about my experiments in making oil changes easier and less messy on my 1999 Royal Enfield Bullet. My Royal Enfield is the old Bullet, little removed from its original 1949 design.

Motorcyclists were Real Men in 1949, oil was always oily, and they tended to be in close contact most of the time.

Motorcyclists, one Real Man told me, wore oily jeans because there was no sense getting oil on your new jeans.

I bought my Royal Enfield because I wanted to travel back in time, not just ahead in distance. It turns out that not everything about visiting 1949 is very tidy. So be it.

I may not be a "Real Man," but I am a "Retro Man" to my oil-contaminated end.

I was encouraged in this by Paul d'Orleans, creator of the authoritative and wide ranging website "The Vintagent." He started it in 2006, as a blog; reading it taught me a lot about real vintage motorcycles, not simply retro ones like my old Bullet.

In 2016 The Vintagent expanded its reach to film, culture and, lately and perhaps most notably, electric vehicles. 

The things I love about The Vintagent are still there. Check out Paul's piece on a guy called "Paladin," a Real Biker and philosopher of the old motorcycle scene in San Francisco, oily jeans and all.

Far more up to date is "The Current," the section of  The Vintagent that covers modern, even futuristic electric vehicles. It explains itself this way:

"It’s an ever-evolving, even frantic, landscape of electric vehicles, and it can be tough to keep abreast of all the latest bikes, batteries, and news constantly flooding the market. That's why we’ve re-launched our weekly EV News Roundup to bring you cherry-picked stories that matter to you."

For sure, I didn't know any of this stuff, and much of it is jaw-dropping, even if some vehicles featured won't be on the streets this year, or next year.

One recent edition of The Current introduced me to the Daymak Spiritus, a three-wheeled (and thus maybe a motorcycle) two-seater. It's due in 2025, in two versions, one costing $20,000 and the other $150,000. The more expensive version is to have three-wheel drive and a 0-60 time of 1.8 seconds.

Both versions will offer a crypto-currency "suite." Not only will the vehicles enable you to pay as you go in crypto, they will mine Bitcoin in their spare time. I am not making this up; check the Daymak Avvenire website.

It also says the company has $1 billion in orders on hand, perhaps proving that The Current is really onto something electrifying.

You wouldn't have to change the oil. Hmmm. Maybe I could get used to that.

Friday, August 7, 2020

Royal Enfield oil filter: Which diagram is right?

Diagram of Royal Enfield oil filter assembly.
There's something funny about this illustration from
the owner's manual of my 1999 Royal Enfield Bullet.
If you own an old-fashioned, iron-barrel Royal Enfield Bullet motorcycle, you know that changing the oil filter is a messy job. Instead of a modern spin-on oil filter, you have a filter "element" that fits inside a housing in the side of the motor.

It is held in place by a spring-loaded cover and associated washers and nut.

Your owner's manual explains how to put all these bits back together. In a blog item here in 2008 I noted one oddity in the diagram shown in the owner's manual of my 1999 Royal Enfield:

The spring in the cap bears directly on a delicate felt washer!

The felt washer in turn is on top of a metal washer that would likely better withstand the pressure of the spring. Shouldn't these two be reversed, to put the spring pressure directly on the metal washer?

If so, is that a typographical error in the manual?

Well, if it is, my dealer didn't balk at it when he changed the oil. That's the way I found the pieces arranged when I did my own first oil change.

And I have done it this way, ever since, despite a friendly warning from a reader that I had it wrong. I have always wondered whether I am right or wrong.

Then, recently, I came across an eBay ad for a 1954 owner's manual for a Royal Enfield 250cc Clipper. Despite its age, the design of the 1954 Clipper is related to my 1999 Bullet.

(Proof that my motorcycle is a true antique, although still only 21 years old.)

Diagram of Royal Enfield oil filter assembly.
This illustration from the 1954 owner's manual shows
the metal washer between the spring and the felt washer.
Sure enough, the oil filter diagram in the 1954 manual shows the felt washer belongs beneath the metal washer, where it is protected from the spring.

Which manual is correct, 1954 or 1999? Does it matter? I don't know.

In 2008 I wrote that reversing the order of felt and metal washers resulted in a leak. But I now question how anything could have leaked past that firmly attached spring cap.

I guess I will have to it try again.

Your comments are invited, below.

Wednesday, October 29, 2008

A man 'out of his time' buys a Royal Enfield


Part Two

Josh Moore returned from his travels in the Sahara determined to buy a motorcycle to ride at home in Kansas. He was drawn to the Triumph Scrambler but something stopped him. If you've looked at his personal blog, you know it has an "Indiana Jones" theme and he has the experiences to justify that. Moore liked the appeal of heroic times. He explains:
"I've always been a man obsessed with most things vintage and retro. My girlfriend Jasmine and others have sometimes referred to me as a 'man out of time' -- and I tend to think that I should've been born 50 to 100 years earlier. I'm stuck in a past that, for me, never even existed, and feel such a nostalgia for an era that I never knew.
"The price tag on the Scrambler was my only hesitation. I decided to keep looking around. No choice could've been better made. Whenever I ran across the Royal Enfield online I was instantly in love. I informed everybody I knew that I would be buying a Bullet ASAP.

"It was also no contest which bike I would buy: the Military model pulled every string inside of me that was tethered to my love for vintage and military-esque items. It's hard to even put into words how giddy I felt when I first laid eyes on it. I knew it would be mine.
"I did some research and found out about the fabled 'constant maintenance and repairs' that these bikes demanded from their owners. As a young kid with absolutely ZERO mechanical experience, I was a little concerned (to say the least). I never knew how to change the oil on my car. I tended to ALWAYS neglect taking care of it -- never washed it, wouldn't change the oil until I was about 3,000 miles afterthe 3,000 mile oil-change mark, never worried about new tires, etc. I was a bad owner. This made me a little worried about how I would fare with the Enfield Bullet.
"I loved the idea that this was a bike you could tinker with and work on while on the side of the road, if you had to. I loved the idea that this was a bike that would probably run forever if you treated it right. Slowly, I began to fall in love with the idea of learning to become a mechanic, learning to treat the bike as, essentially, an extension of myself and taking care of it. I took the dive and 'bought the Bullet'."

Next: So how does he like his new Bullet?

Friday, June 23, 2017

Royal Enfield's old Albion gearbox tells a story

Royal Enfield four-speed gearboxes, separated by 40-plus years.
My 1999 made-in-India left-shift gearbox is at right.
I've only just praised the obsolete Royal Enfield four-speed gearbox on my 1999 Royal Enfield Bullet, and along comes an eBay advertisement for a similar but obviously far older example of the same thing.

And, my, doesn't it look familiar?

There are differences. The older one is right-hand shift, of course, as most were. Only where legally required were they made to shift left, as is mine.

Note oil filler plug at top right of gearbox. Mine has one there, but...
But, wow, get a load of the bolt that covers the top oil filler hole. Stamped on it — in oh, so tiny type — are the oil specifications for the gearbox.

Castrol, Mobiloil, Shell, Essolube, Energol. Great old names that mark this gearbox as a product of Redditch, England.

...the older gearbox filler plug is labelled.
The poor filler plug is a bit bunged up but I would love to have it. The filler plug on my made-in-India gearbox is plain.

I'm a little surprised that the filler plug specifies oil.

My understanding was that gearboxes back then were filled with grease from the factory, as there was no proper seal on the sprocket side to retain oil.

My 1999 gearbox came from India filled with what some used to refer to as "elephant snot." That stuff stayed put.

When I tried using oil the gearbox it soon bathed everything behind it in oil. At a sprocket change my mechanic fit a seal, and oil has worked fine for me ever since.

Canadian Royal Enfield enthusiast Chris Overton kindly identified the old gearbox, based in its serial number, as being from a 1965 Series 1 Interceptor.

I wonder what stories this eBay gearbox could tell of its travels.

Sunday, December 28, 2008

Oil filter oddity pressures felt washer

In my post "Ten Bad Things Other People Do to Your Bullet" item Number Eight was:

8. Oil filter parts re-installed in the wrong order. Yes, it does seem odd that the spring in the cap bears on a fiber washer, but that is the way it's supposed to work. Putting the metal washer between them instead of on the other side of the fiber washer means an oil leak for certain.
A friendly comment from "Anonymous" disputed my observation. "You're wrong about Number 8," this person wrote: "It's spring, washer, felt washer then cup washer."

I reassemble my oil filter with the spring bearing on the felt washer because that is the way I found it when I did my first oil change. It struck me as odd but, when I experimented by reversing the order so the spring pressure was on the metal washer, I got a leak. Why? Maybe the spring somehow distorts the way the metal washer compresses the felt, whereas the spring "digs in" to the felt when it is properly installed.

The owner's manual that came with my 1999 Bullet bears me out. Here is the illustration, on Page 39.


Friday, March 2, 2018

Rare multi-valve Royal Enfields made their mark

A surviving Royal Enfield Model 352 racer of 1925;
it carried a 350cc JAP motor with two exhaust ports.
Mick Lemon, president of the Royal Enfield Club of Australia Inc., got his first motorcycle at age 15. It was a 1949 Royal Enfield Bullet. That early start led him to ownership of nine Royal Enfields, ranging from 2005 back to 1923. His collection includes some of the very rare multi-valve Royal Enfields of the brand's early days. This article first appeared in The Gun magazine of the Royal Enfield Owners Club UK. He graciously agreed to have it repeated on this blog.

By Mick Lemon

Royal Enfield are not well known for their faster high performance machines, but back in the '20s and '30s, things were different. Enfield entered factory teams in the Isle of Man up until 1935 and they manufactured some high performance, technically advanced machines right up until World War II.

There are a group of lucky owners spread over the world who own Royal Enfields made in the 1930s that have four valves and were manufactured for the high end market and/or racing. There was also a three-valve model made for only one year.

During the mid-to-late 1920s Royal Enfield gained some racing credibility — especially in the 250 and 350 classes of racing. JAP engines were used, some having twin exhaust ports and close ratio Sturmey Archer gearboxes.

The top end 350 was known as the Model 352 (the Model 351 had one exhaust port). Successes included winning the Ulster Grand Prix in 1925 and second place in 1926, winning the South African Tourist Trophy races in both the 350 and 600 class.

In 1927 Royal Enfield won the Isle of Man TT Junior class (i.e. 350cc). Manufacturers Team Prize for the first works team with the four team members getting third, sixth, seventh and eighteenth. Well known riders of the day included Stan Woods, Cecil Barrow, Charlie Young and Fred Bricknell.

While Enfield were still using JAP engines, they were busy developing their own engines and some very nice overhead-valve twin-port machines in the 1928-1930 seasons in 250, 350 and 500 capacities, including the Models CO and E.

There was a huge amount of development and experimentation being carried out by the lead manufacturers during this period and benefits to performance were obvious.

The first four-valve machine entered the range in 1931 and was known as the Model JF. The four-valve machines were also often known as the Bullets — a name that is still used by Enfield today. At this time though, the Bullet name was only associated with the sports models.

This bike had the near square-bore dimensions of 85mm X 85.5mm that continued to be used until 1936 for the 500cc bikes and was also used for the 1,000cc V twins. Oil tank integrated into the crankcase castings and the use of the patented Enfield oil pumps came common engine design features through most of the range of models from this time. The four-valve machines were well presented with chrome tanks and instrumentation on a panel in the tank.

In 1932 there was a design upgrade and the Model LF was introduced, having push rod tunnels cast into the cylinder casting and either a three-speed hand change gearbox or a four-speed gearbox foot change.

Options for high compression pistons and factory tuning were available, along with upswept exhaust pipes. The higher spec machine sold for a whole 2 pounds more!

1933 saw a frame design change and well as further engine improvements. One of the major issues with the four-valve engines was the cracking of the cylinder heads when the machines were ridden hard. This occurred between the exhaust ports and was also an issue for other manufacturers. Bronze heads were used on racing machines to reduce the chance of cracking that took place with the cast iron heads.

A bronze-head Royal Enfield 1934 LF still running and in racing trim.
The high compression pistons were sold with an expectation that pure penzole (alcohol) was used for the fuel and max power was stated to be 29.5 bhp. The standard four-valve machine produced 24.5 bhp. The 2017 fuel-injected Bullet 500 has a stated power output of 27.2 bhp. How far have we progressed since 1932 I hear you ask!

The last time Royal Enfield provided a factory team for the Isle of Man was 1935. In that year, a LF ridden by Cecil Barrows came eighth in the Senior event, beaten by Moto Guzzis, DKWs, Nortons and one HRD. The Enfield came in ahead of all other HRDs and all Velocettes. This may surprise many classic bike people. The LF ridden by Cecil in the IOM still survives and is in Europe.

In 1935, the LF was dropped from the range in favour of a three-valve model. The reason was due to the head cracking issues with the four-valve machines. The new model was called the LO and had two inlets and one exhaust valve with fully enclosed valve gear. The performance of the LO was significantly down on the LF and the model was quickly dropped again in favor of a completely new machine in 1936 known as the JF (reverting back to the JF model name).

The new JF was a totally different machine with a vertical engine, replacing the sloper layout, and had a full cradle frame. The head was redesigned yet again and cracking was reduced, although bronze heads were still available as an option for machines used in competition. This model of JF was essentially based on the common J model bike, but was fitted with alternative barrel, head and valve gear, as well as being presented with chrome tank, guards and primary. The model was offered in its own right in 1936 and '37.

A 1937 Model JF (one of four running JF’s known to exist in Australia).
In 1938 the JF was dropped; however, the four-valve head was available as an option for the J model in that year only. 1938 was the last for four-valve machines built by Royal Enfield as the whole industry changed the focus to supplying machines for the war efforts.

Examples of these “multi-valve” Enfields have survived and are located across the globe. There are examples in England, Holland, Finland, Australia, Canada, New Zealand, U.S. and even Guatemala and the Canary Islands!

There is an email group of owners who communicate with each other and assist in the restoration and knowledge base of these machines. If you are lucky enough to own one, have expert knowledge of these machines, or have a keen interest in them, joining the email group may be a worthwhile exercise.

Monday, September 28, 2009

What to bring on a Royal Enfield trip


What tools and parts should a Royal Enfield motorcycle rider take along on a cross-country trip?

My favorite answer to this question appeared years ago on the Royal Enfield Yahoo message board: "Take a spare Royal Enfield."

The suggestion was meant to be funny, but I suspect there's good advice in the attitude expressed. Whatever you do, don't forget to take along your sense of humor.

But, what else should you bring?

John Powell's description of his trip the length of Old Route 66 brought this question from reader Bob Slovey:

"I was wondering about what type of modifications he may have made to prepare his Bullet for the trip? The photos don't show much, if any, modifications. I am extremely curious about how he fastened that huge bag (in the upright position) to the back of the bike. Did it ever fall off? Did he use a special rack? Did he carry emergency supplies, such as: gasoline, extra oil, tire repair kit, air pump, etc.?"

Powell graciously replied:

"The only preparations for this trip was buying a Route 66 guide, the book The Grapes of Wrath and breaking in the bike before I started out.

"Everything on this bike is stock. The first modification I will do is change out the mirrors and then maybe some foot pegs further up so I can stretch my legs more on the long rides.

"I just bought this North Face Big Shot backpack from REI on sale and it has a bunch of straps on it. Because of the well placed straps and the way my laptop was situated in the bag, I only needed two ratchet straps to hold it in place. It never came loose and it doubled as a good back rest.

"Inside the backpack was an oil filter, a spare tube, throttle cable, clutch cable, brake cable and few random tools. In one of the outer pockets I kept the chain lube. I figured I wasn't too far from help if I needed anything more than that and luckily I didn't.

"I did convince a Walmart manager to let me use some of his tools and let me change my oil behind his building.

"I also almost lost my heat shield on the second day of the trip. I had to look all over a small town trying to replace two of the three bolts that had fallen out. Luckily I found the replacements at Tractor Supply Co. Other than that, I had no issues."

Thursday, February 10, 2011

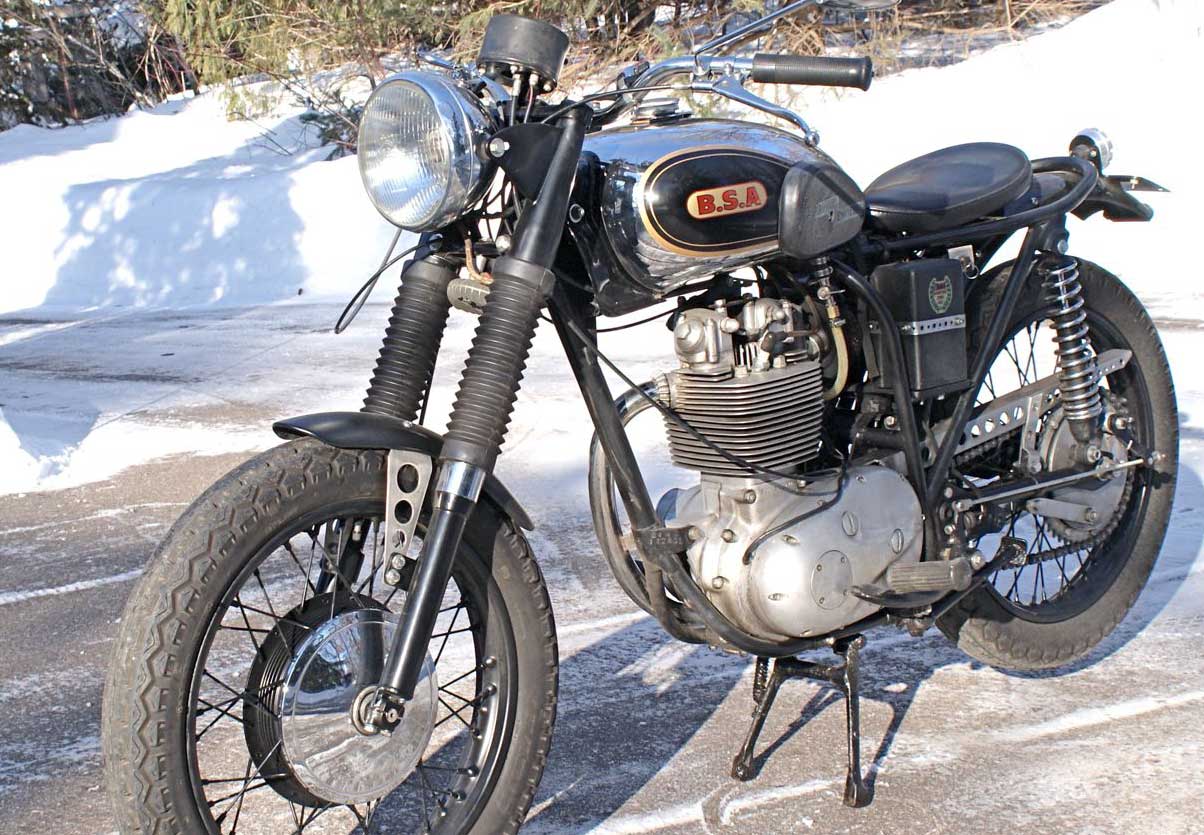
BSA bobber owes a little something to Royal Enfield

BSA bobber has a surprising Royal Enfield feature.
Donald McMahan writes from snowy Minnesota about his BSA bobber. He previously shared the story of his Royal Enfield Interceptor and Royal Enfield Indian Chief  with us. The bobbber looks great, thanks in part to his familiarity with fiberglass work.

He explains why the motorcycle may look familiar to someone accustomed to Royal Enfield motorcycles:

"I saw the mention of a '60s BSA single on your blog and couldn't resist presenting my latest project, completed this last summer.

"I wanted to buy a 1968 BSA B44R 441 Shooting Star new, but couldn’t afford it. Instead, for my first real motorcycle, I bought a 1968 Yamaha YM-1 305cc for a little more than half the price of the BSA single. A friend of mine had a 441 Victor, the “scrambler” version with a high pipe. I loved riding behind him, listening to that fine British single-cylinder exhaust note.

"Again, in 1970 I looked at a used Shooting Star, but had enough experience by then to know that I wasn't fully capable of doing all of the maintenance to keep it running right and couldn't afford paying a shop to do it. I ended up with a Honda 750; the only maintenance required was oil changes and chain adjustments. Those, I could do.

"I found a used Shooting Star in 1986 for about the same as I would have paid for a new one in 1968. Either it held its value or inflation has beaten up our dollar, depending on how you look at it. The bike was completely stock with the fiberglass gas, oil tank and side cover. The single cylinder starting procedure intimidated me for a long time. I would ride it only on weekends and never go anywhere I would have to shut it off for very long.

"Over the years I learned to take the carburetor apart with a screwdriver and a pliers in a ditch alongside the road — don't ask, it got me home. Before we had cell phones, my wife would remind me to carry change for a phone call every time I rode the BSA.

"George Helm put in an electronic ignition and the mysteries of adjusting points and timing came down to a simple twist of the plate. I got tired of the fiberglass and fished the Victor oil tank out of the bottom of a pile in a motorcycle junk yard.

"For a while I went with a dented chrome A-65 (650cc) BSA gas tank that I got from George. I painted over the bondo-filled dent for a mostly chrome look. With the stock chrome fenders it didn't look too bad.

"Life gets busy and I never did rely on this bike as a daily runner, and it sat. It hadn't been run in eight years when I started working on it again.

"I've always loved the bobbers of the '40s. That was my goal, but I didn't want to do any major cutting on the frame. I removed most of the bosses and bracket for the stock fenders, horn, etc.

"There have been a few occasions when I rode without a front fender while I was working on different bikes; that's one bit of pure bobber design I know I can't live with. A face full of road grit isn't my idea of a fun ride, so I made a fiberglass front fender that hugs the front wheel and is as small as possible. A year and a half into the project I retired. Soon, the BSA was coming together.

Did you spot the Royal Enfield influence?
"I imagine that you may have guessed the gas tank is from India and would be at home on a new Royal Enfield. I scrubbed the Royal Enfield script from the knee pads with a razor blade and a light sanding.

"Both fenders and battery box are fiberglass, taillights are LED. The battery box holds a gel cell. I created other various bits using stainless and some aluminum. I think that the big stock headlight looks right, a personal preference. That's what bobbers are all about.

"I would like to change the pipe and muffler for something smaller, but as I get older I don't like loud and I don’t think there’s a quiet option that would look better.

"After much fitting and refitting I bolted everything down tight, put some fresh gas in the tank and plugged in the battery. After a couple of priming kicks I turned the ignition on and it started on the first kick, no kidding.

"I trust it now and love taking it out, stopping and allowing people to see it, then go through a bit of a show kicking it through to get on my way.

"Call me a criminal if you must for destroying a stock Brit, but I like it and I ride it."


Friday, October 13, 2017

The 10 steps to starting a classic Royal Enfield Bullet

I like to start my Royal Enfield Bullet with the motorcycle safely on its center stand.
Nothing is more fraught with significance than starting your classic iron barrel Royal Enfield Bullet motorcycle. Especially if someone is watching.

Are you not man enough to kick start a motorcycle?

And how are you going to get to the motorcycle rally if your Bullet won't start? Drive your car? You would never live that down.

Here's the starting procedure I employ every time I start my 1999 Royal Enfield Bullet after it has been idle for a few days or a week. Advice here applies to these old fashioned Bullets. If your Bullet has electric start there will be other considerations, such as raising the kickstand.

1. Put the Bullet on its center stand. I prefer starting the Bullet while standing next to the motorcycle with it supported on its center stand. This eliminates trying to balance the motorcycle while astride it. It also means that you can delay putting on riding gear until the motorcycle is running.

Clean the spark plug (or change it) to ease starting.
2. Clean the spark plug. This only takes a moment and it's cheap insurance against having to huff and puff on the kickstarter, hoping a random spark will occur.

Drain the sump (by removing the most forward drain plug.)
3. Drain the oil out of the sump. Oh, you thought this was going to be easy, huh? Do you want your Bullet to produce clouds of smoke when it starts? How is that going to look? Classic Bullets may "wet sump" if left sitting for even a day or two. Small amounts of oil leak into the sump and will smoke up the whole neighborhood if you don't remove it before starting the motor. Replace the plug. You will need to add oil to replace the amount you drained off.

If you drain off significant amounts of oil, you must replace it.

Put the kill switch in the "Run" position.
4. Move the kill switch to "Run." DON'T IGNORE THIS STEP.

Turn on the fuel supply.
5. Move the fuel tap lever to "Run." The lever points down towards the ground when it is in the Run position.

Hold the clutch lever and kick until the kicker goes limp.
6. Free up the clutch by squeezing the clutch lever and kicking the kick start lever until it goes limp. Bullet clutch plates tend to stick together if left in contact. Unless you free them up this way you may get quite a jolt the first time you put the gearbox in first gear with the motor running.

Turn up the idle. Slightly open the throttle as you do this to save wear on the knob.
7. Rotate the idle control (knurled metal knob on side of the carburetor) clockwise half a turn. This increases idle speed, so if the motor does start, it will be likely to keep running. Once the motor is running cleanly you can turn the knob counterclockwise to reduce idle speed to your liking.

Hold the decompressor open as you gently move the kickstart lever to move the piston past compression.
8. Turn on the ignition and set the piston. The idea here is give your kick the best possible chance to fire the motor by placing the piston in the ideal position. Just press on the kick start until it encounters firm resistance (compression). Now press the decompressor lever with your thumb and gently press just a little bit more on the kickstart to move the piston just past compression. With the ignition on you will see the amp meter flick from discharge (left) to near center (right) as the piston reaches the correct position.
With the ignition on and decompressor open, watch for the amp needle to swing right.

You may or may not need the enricher to start.
9. Set the enricher lever by pushing down on the lever on the carburetor.

10. Now kick start the motorcycle. Your kick should be long and fast. Strength is not the issue. Kick confidently and kick all the way through. IF YOU USED THE ENRICHER LEVER be sure to push it back up once the motor is running or your spark plug will foul.

Didn't start? Go back to Step 8 and try again, this time without using the enricher (Step 9).